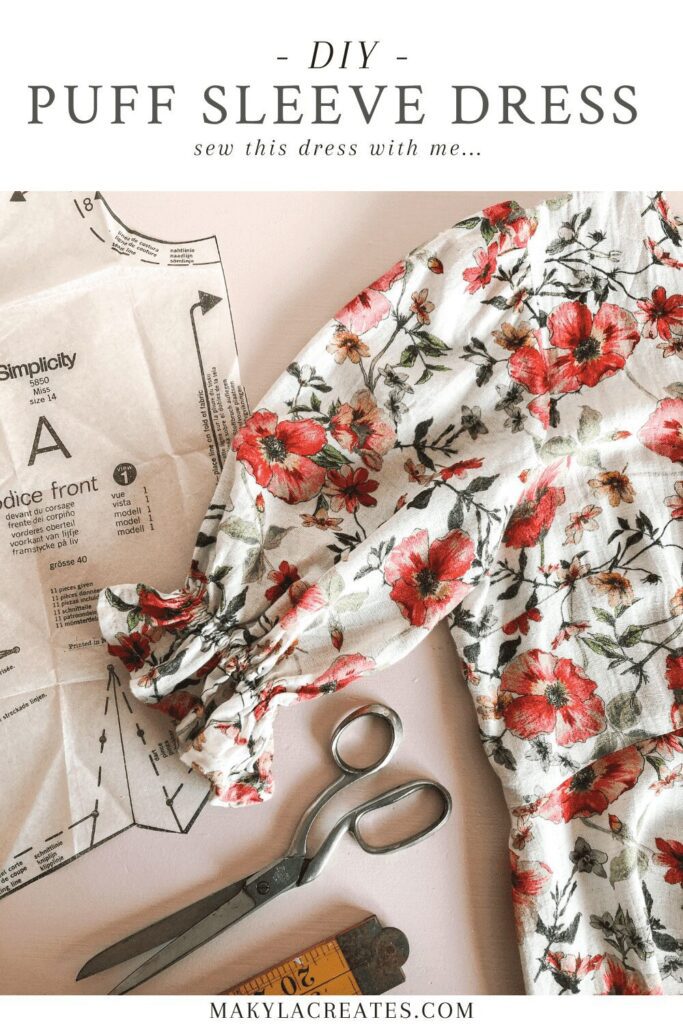
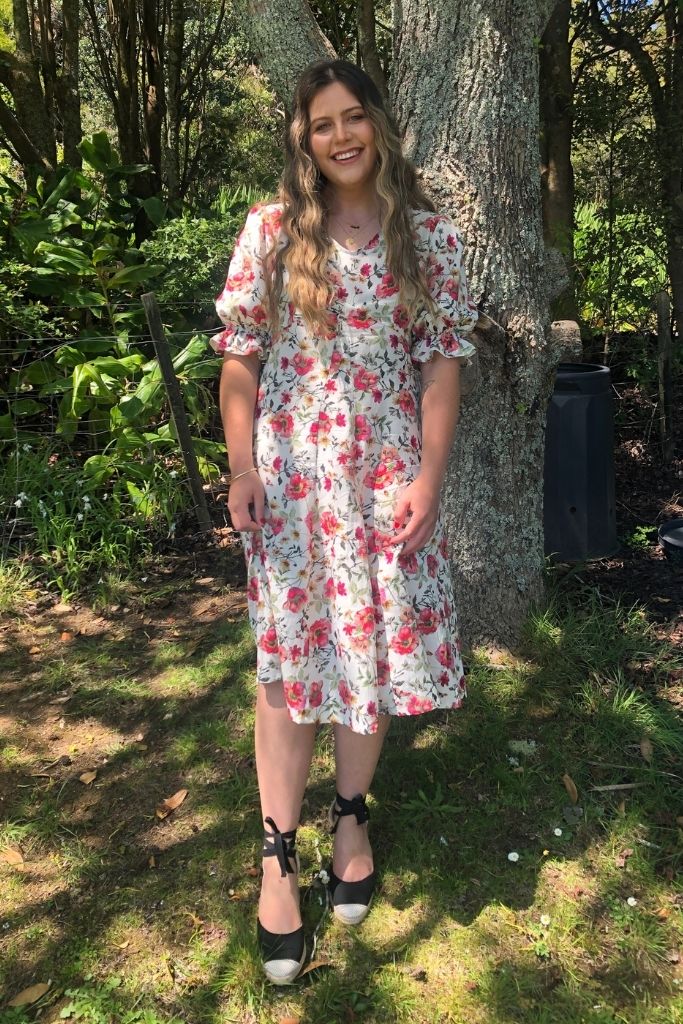
Learn how to make this DIY shirred puff sleeve dress with this easy to follow tutorial. I used a vintage Simplicity sewing pattern for the base of this dress, then adapted a few of the pattern pieces to create a modern puff sleeve style.
Adapting sewing patterns is an exciting skill to learn as you will allow more design freedom when it comes to making your own clothing. As anything this will become easier the more you experiment and through trial and error. If you haven’t tried altering a sewing pattern before I encourage you to give it a go!


TIPS ON HOW TO PLAN WHAT ADAPTATIONS TO MAKE
Planning pattern adaptations can seem really overwhelming especially if this is new to you. My advice is to sketch up your idea first so you are able to have a clear vision from the start. Once you have a design sketched out I recommend finding a sewing pattern with a similar silhouette.
My DIY shirred puff sleeve dress has been inspired by the popular Ganni dress seen in a lot of street style images on Pinterest. This style is a midi length dress with puffed sleeves and a front godet detailing (triangular shape fabric piece). You can watch my video tutorial to find out more about the style and inspiration for this dress.
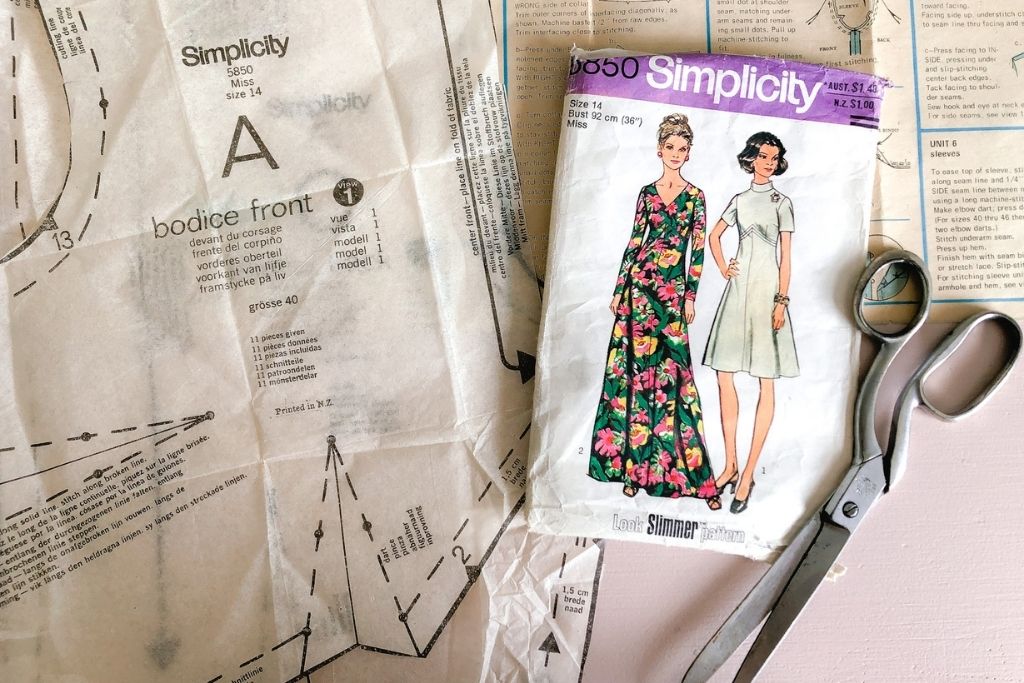
I have chosen to use a vintage Simplicity sewing pattern, style 5850, which I found on TradeMe (New Zealand’s equivalent to eBay). I purchased this pattern after I planned my design, as I knew this silhouette could be easily adapted to fit my finished look. If you would like to follow along with this tutorial search eBay for the pattern number and name otherwise any similar pattern should work fine!
Please note this post contains affiliate links, which means I make a small commission at no extra cost to you. You can read the full disclosure here.
The next step is to jot down the changes that need to be made on the pattern to fit your design.
Here is my list of adaptations needed to create my final shirred puff sleeve dress:
- Change the neckline from a curve to V-Neck.
- Shorten the sleeves to above the elbow and add fullness to create puffy sleeves.
- Add a godet to the centre front skirt (A godet is a triangular shape of fabric added for extra width or design)
- Shorten the skirt to be midi length.
HOW TO ADJUST THE PATTERN PIECES
Front Neckline
Let’s begin the pattern alterations at the top of the garment by changing the shape of the neckline. I used the bodice from view 1 to share how simple a neckline change can be.
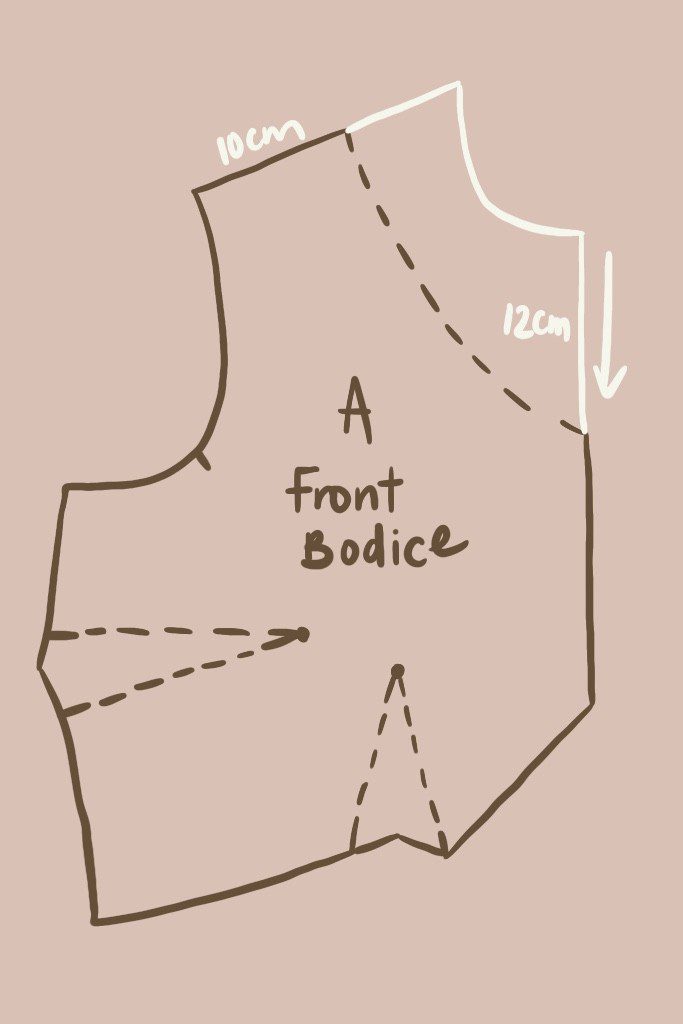
Start by tracing out the front bodice piece onto newsprint or paper then measure how far down you would like your neck line to finish. I chose to drop my neckline 12cm from the top edge of the pattern piece.
I also made the shoulders narrower in order to open up the front chest area more. To do this I measured from the armhole edge of the shoulder in 10cm.
Next, shape the neckline to touch both points. I added a slight curve to the v-neckline as this will help it sit a bit more flattering.
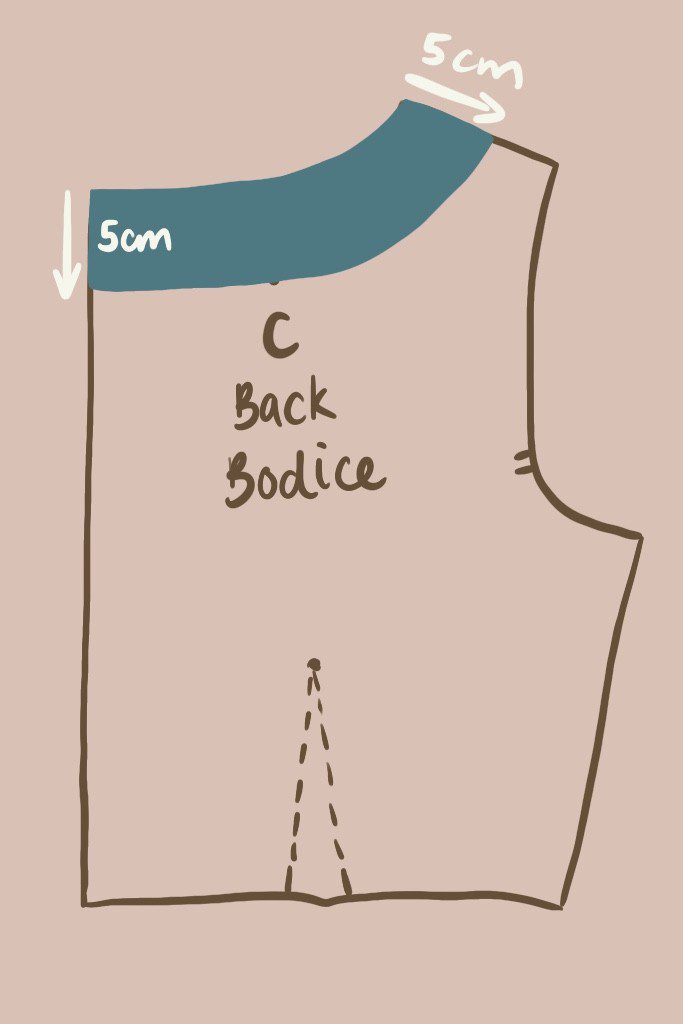
Back Neckline
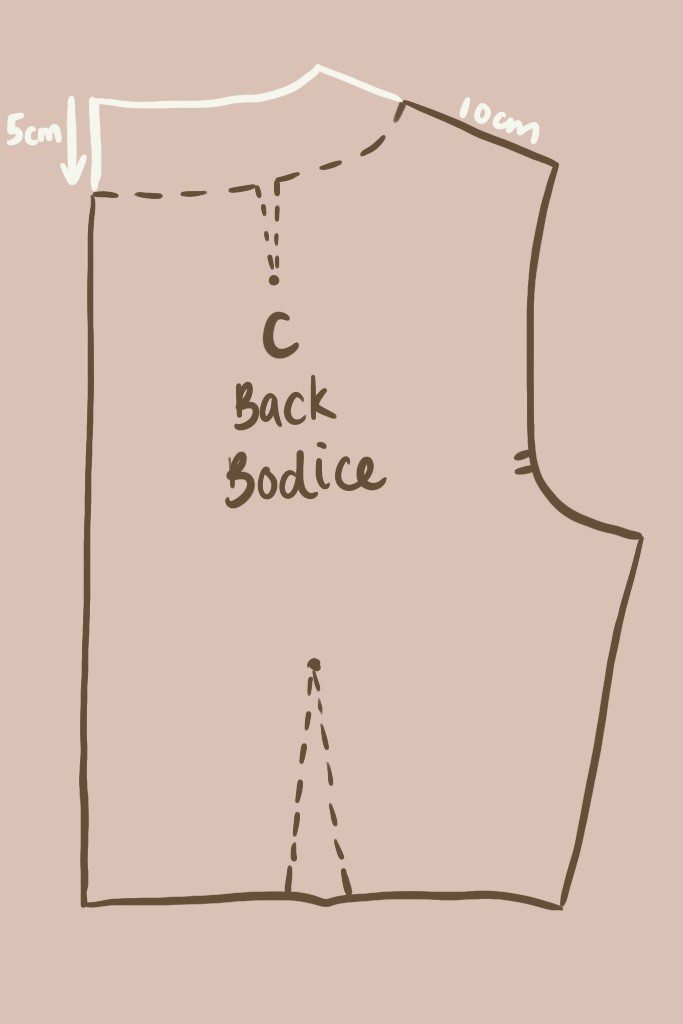
Trace around the back bodice then measure the same at the shoulder to create a 10cm wide shoulder seam. Place the front shoulder along the back to create a nice smooth curve around for the back neckline.
Create Neck Facings
Since the neckline has been adjusted new facings will need to be made. This step is very simple, when I first learned how easy this was I couldn’t believe it!
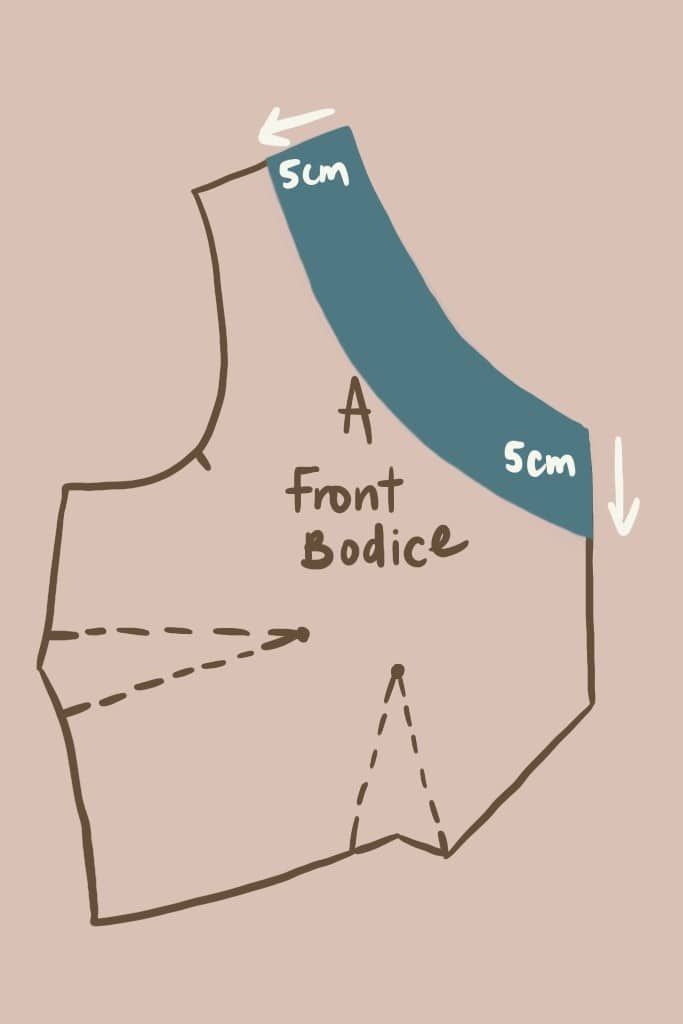
Place the front and back bodice under a new piece of paper and trace around the necklines, shoulders and CF/CB points. Measure how wide you would like the facing to be along the shoulders and the CF/CB. My facings are 5cm wide.
Draw a curved line 5cm wide in from the neck edge and cut out the facing pieces. You will have 1x Front facing and 1x Back fabric pattern pieces.
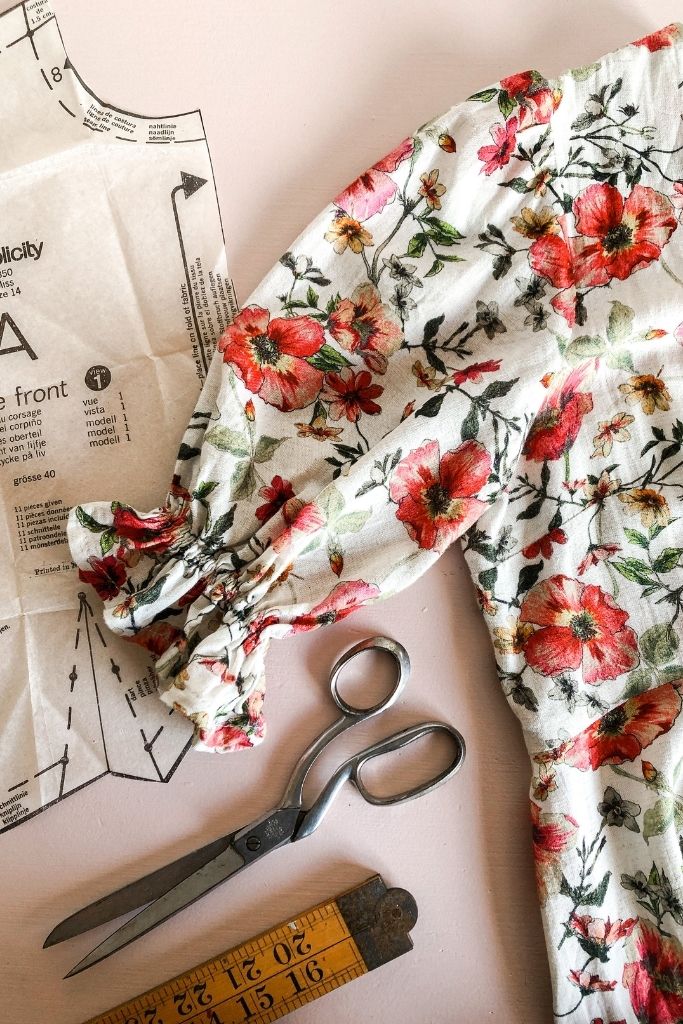
Create Puffy Sleeves
This is my favourite pattern adaptation to make because puffy sleeves rock!
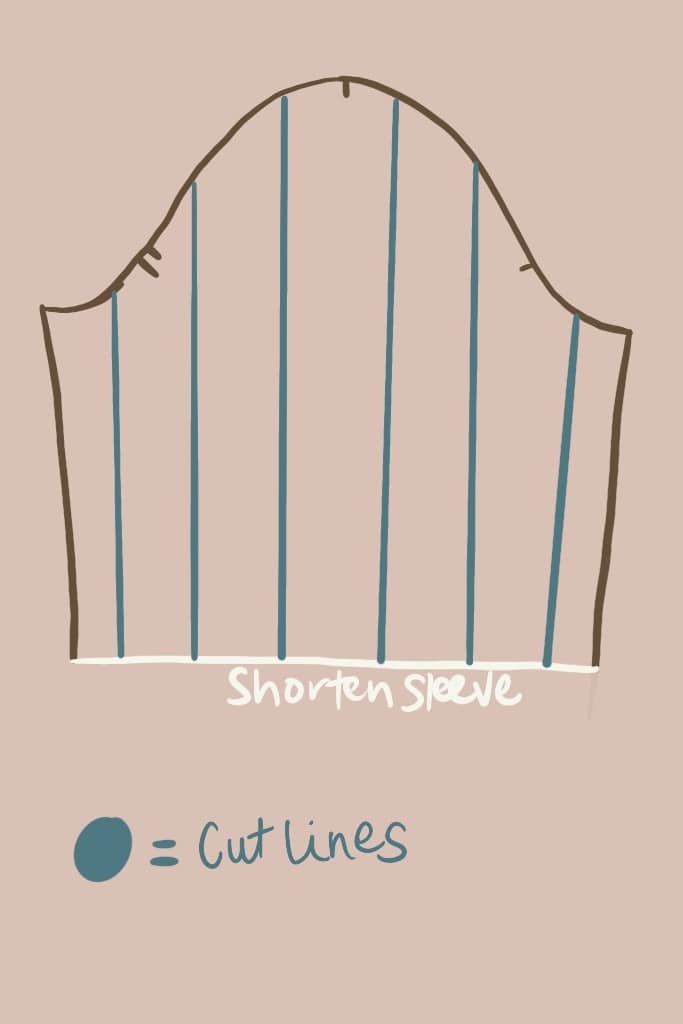
To start off trace around the sleeve piece onto a piece of paper and shorten this to sit at the elbow length. Cut this out. Then cut 3 slashes from the bottom of the sleeve up to the sleeve head on either side of the sleeve. Try not to cut into the sleeve head as the sleeve needs to stay connected.
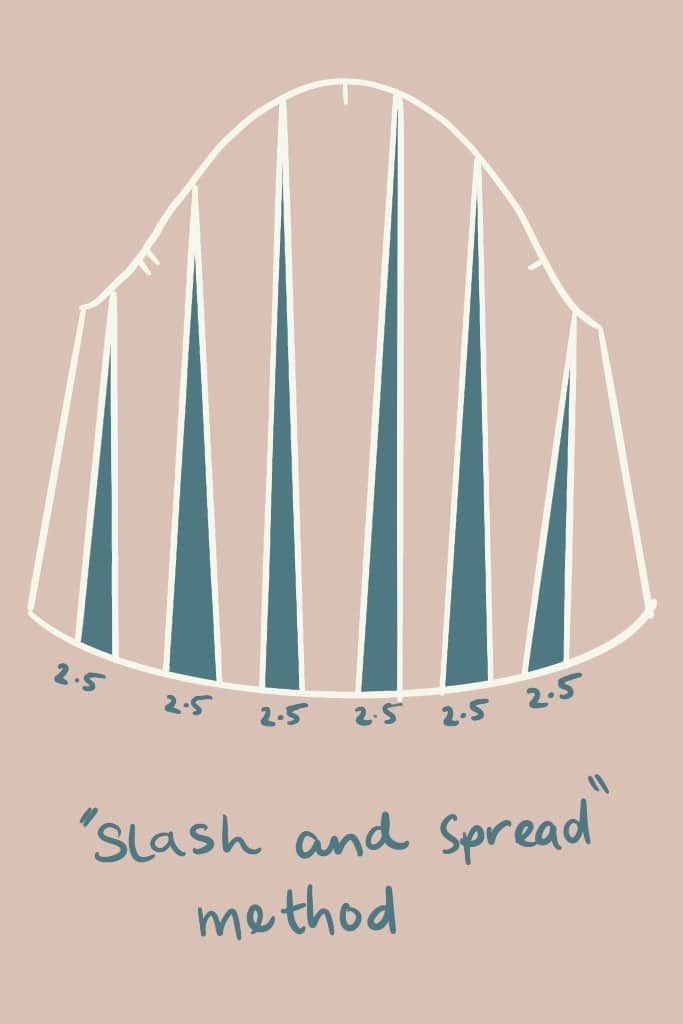
Grab a new piece of paper and glue the first slash onto the paper then start to spread out each segment evenly. I would suggest 2.5cm in between each segment. Glue as you go. This is called the ‘Slash & Spread’ method, which is adding fullness into the sleeve but not changing the size of the sleeve head. This is important as the sleeve fits perfectly to the armhole and once you change the sleeve head length it will no longer fit the armhole.
Draw a curved line from each sleeve end to create a new hem line. Cut out the new sleeve pattern.
Shorten the dress length
Before moving onto my godet panel I shortened the dress skirt pieces. Measure from your waist down to the desired length. Measure this onto the front and back skirt pieces from the top of the pattern pieces and cut off the excess length.
Create a Godet
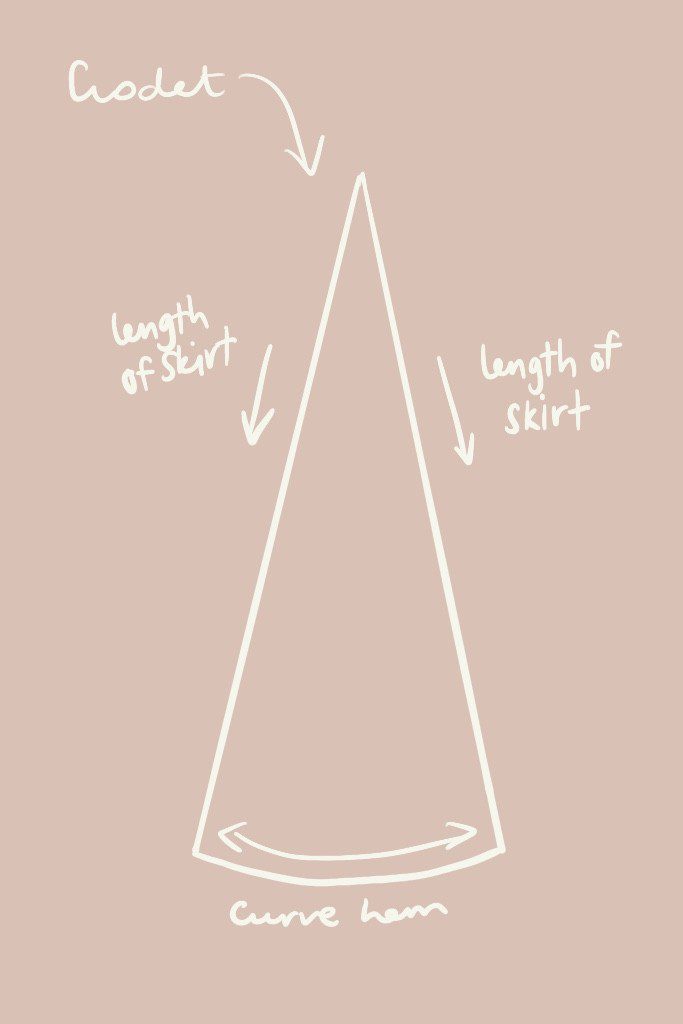
A godet is a design feature that looks like a triangle shape. It can add extra space in a garment if things are feeling a little bit tight! As I was inspired by Ganni for this shirred puff sleeve dress I wanted to add a godet to the centre front of my dress too. You can skip this step if you like.
Using the same measurement as the skirt length, draw a straight line onto a new piece of paper. Then draw an angled line out about 10cm at the bottom of the line. Curve at the bottom and you will have a triangular godet pattern piece. Cut this out.
CutTING list
- Front bodice x1 on the fold
- Back bodice x2
- Front neck facing x1 on the fold
- Sleeves x2
- Front skirt x2
- Back Skirt x2
- Godet x2 on the fold
Start to sew
When it comes to sewing patterns that have been adapted make note of the steps in the instructions and think about how the newly adapted pieces may need to be sewn in.
I followed the instructions as they are, except for I added shirring on the sleeves and I added the front godet to the centre front skirt instead of sewing the seam together.
HOw to create shirred puff sleeves:
Join the sleeve side seams and neaten as normal.
Turn the bottom of the sleeve up 1cm and again another 1cm. Pin in place and edge stitch hem down.
Hand wind a bobbin with shirring elastic (like this here) and place it into the machine. Leave the top thread as is. Change the stitch length to around 4-5.
Begin sewing 5cm from the hem with the right side of the fabric facing up. This is important as the shirring thread needs to be sewn on the inside of the garment. Sew around the sleeve and knot off the elastic inside.
Sew two more rows of shirring 6mm above the last and knot off the ends.
Pop your iron onto steam and steam over the shirred area to shrink the elastic, which will create a nice tight gather.
Follow along with my video tutorial to see the rest of the sewing instructions.
Check out my Camille Top sewing pattern here if you would like to make more puffy-sleeved garments. You can also follow my free tutorial on How to Make a Puff Sleeve Top here.
This was so helpful, Makyla! I am working on a dress with a similar neckline, and I need to try out your adjustments on a toile!!
Tulsi
http://www.anothernewobsessions.com
Hi Tulsi, Im so pleased you found this post helpful! I hope all goes well – would love to know how you get on.
– Makyla x