
If you’re looking for a cute and practical Easter basket for your little ones (or yourself!), look no further than this DIY Easter bunny fabric basket. Made in just 30 minutes, these fabric baskets are adorable, reusable, and perfect for gifting chocolate. Plus, it’s a great sewing project for beginners or any sewing level!

These fabric bunny baskets are a charming addition to your Easter decorations and make a perfect gift for your loved ones. You can fill them with Easter goodies, such as chocolates, candy, or small toys, and surprise your kids or friends with a personalised and reusable Easter basket.
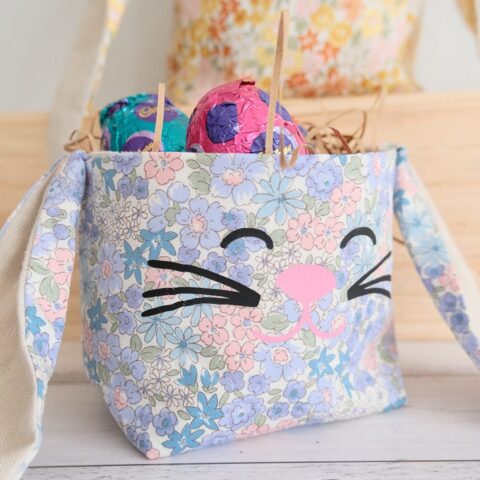
The bunny ears and vinyl face add an extra touch of cuteness, making these baskets a standout piece among traditional Easter baskets. The ears can tie up into a handle or bow to be carried.

I used my Cricut Maker 3 to cut iron on vinyl for the bunny face. To create your own head over to my Cricut project and use your Maker 3 to cut out the face.
You can customise the fabric colours and patterns to match your Easter theme or decor. Whether you use it for hunting Easter eggs or as a centrepiece on your table, this DIY fabric bunny basket will bring joy and sweetness to your Easter celebration.
I love making festive items for the holiday season. Some of my favourite projects are these sweet Christmas decorations or this DIY Christmas stocking project.
By making your own holiday pieces, you save money and get to customise things to your style, so let’s grab your supplies and let’s get started on this fun and festive project!
Bunny Fabric Basket Sizes
I have included two sizes for a small or large Easter bunny basket. It depends on how many easter eggs you plan to stuff these cute bunnies with!
Small: 10cm x 16cm diameter (36cm circumference)
Large: 14cm x 20cm diameter (44cm circumference)

Tools and Materials You Will Need:
- Fabric Bunny basket sewing pattern (below)
- 0.5m x 1.12m main fabric (medium to heavy weight cotton or linen)
- 0.5m x 1.12m lining fabric (medium to heavy weight cotton or linen)
- Iron on interfacing (white for light fabrics, black for dark fabrics)
- Matching thread
- Fabric shears
- Tape measure
- Sewing machine
- Pins
- Cricut Maker 3 (optional)
- Smart iron on vinyl – black (optional)
- Smart iron on vinyl – pink (optional)
- Cricut mini press (optional)

How to Make a DIY Easter Bunny Basket
Step One: Fuse the fabric and cut out the basket
Begin by fusing the interfacing to the main fabric. This is easier and quicker to do before cutting out your fabric.
Cut out the fabric according to the size you require below: Cut x2 main and x2 lining.
Small: 16cm x 20cm
Large: 20cm x 24cm
Cut x2 main and x2 lining bunny ears using the pattern.

Step Two: Sew the basket
Sew the main fabric piece’s right sides together with a 1cm seam allowance around three outer edges, starting from one of the shorter sides (side seams).
Sew the lining fabric pieces right sides together with a 1cm seam allowance around three outer edges but leave a gap in the bottom seam for turning.
A small square must be cut from the corners at the bottom of the basket. Measure a 4cm square for the small basket and 6cm for the large. Cut this out on the main and lining pieces.


Now bring the side and bottom seams together on both the main and lining and pin them in place with the seams open flat. Sew together with a 1cm seam allowance. Repeat on the other side.

Step Three: Sew the bunny ears
Place a main and lining bunny ear right sides together and pin them in place. Sew around the outer edges with a 5mm seam allowance. (Start sewing from the non-curved edge, leaving the end open).

Cut notches into the curved part of the seam to help it sit nicely.

Turn the ear through to the right side and wiggle the point out—press flat. At the open end, fold the sides into the centre to touch and press to crease.

Repeat for the other ear.
Step Four: Attach the ears and lining to the main basket
Pin one of the bunny ears to the side seam on the main basket. Repeat for the other side and stitch in place with a 5mm seam allowance. Unpin.

Now place the lining inside out and slip this over the main basket. Make sure the ears are inside and out of the way.
Pin around the top of the basket to attach the main basket and lining together. Sew together with a 1cm seam allowance. Unpin.

Pull the basket main through the hole in the bottom of the lining seam. This will turn the entire basket inside out, so the right sides show, and all the seams are hidden inside.


Stitch the hole in the lining closed by hand sewing or edge stitching it shut. Press the basket, so the seams are all tidy and flat.

Step Five: Add the bunny face
Add the vinyl bunny face to your basket if you have a Cricut machine.
Head to my Cricut project and cut out the vinyl following the project prompts.
Once the vinyl is cut out, place it onto your basket in the centre and press it on with the Cricut easy press iron.

DIY Easter Bunny Fabric Basket
If you're looking for a cute and practical Easter basket for your little ones, look no further than this easy DIY Easter bunny fabric basket. Made in just 30 minutes with my free sewing pattern, this project is enjoyable and fun to use!
Materials
- Fabric Bunny basket sewing pattern
- 0.5m x 1.12m main fabric (medium to heavy weight cotton, or linen)
- 0.5m x 1.12m lining fabric (medium to heavy weight cotton, or linen)
- Iron on interfacing (white for light fabrics, black for dark fabrics)
- Matching thread
- Smart iron on vinyl in black & pink (optional)
Tools
- Fabric shears
- Tape measure
- Sewing machine
- Pins
- Cricut Maker 3 (optional)
- Cricut mini press (optional)
Instructions
- Begin by fusing the interfacing to the main fabric. This is easier and quicker to do before cutting out your fabric.
Basket finished sizes to choose from:
Small: 10cm x 16cm diameter (36cm circumference)
Large: 14cm x 20cm diameter (44cm circumference)
Cut out the fabric according to the size you require below: Cut x2 main and x2 lining.
Small: 16cm x 20cm
Large: 20cm x 24cm
Cut x2 main and x2 lining bunny ears using the pattern. - Sew the main fabric pieces right sides together with a 1cm seam allowance around three outer edges, starting from one of the shorter sides (side seams).
Sew the lining fabric pieces right sides together with a 1cm seam allowance around three outer edges but leave a gap in the bottom seam for turning.
A small square must be cut from the corners at the bottom of the basket. Measure a 4cm square for the small basket and 6cm for the large. Cut this out on the main and lining pieces.
Bring the side and bottom seams together on both the main and lining and pin them in place with the seams open flat. Sew together with a 1cm seam allowance. Repeat on the other side. - Place a main and lining bunny ear right sides together and pin them in place. Sew around the outer edges with a 5mm seam allowance. (Start sewing from the non-curved edge, leaving the end open).
Cut notches into the curved part of the seam to help it sit nicely.
Turn the ear through to the right side and wiggle the point out—press flat. At the open end, fold the sides into the centre to touch and press to crease.
Repeat for the other ear. - Pin one of the bunny ears to the side seam on the main basket. Repeat for the other side and stitch in place with a 5mm seam allowance. Unpin.
Now place the lining inside out and slip this over the main basket. Make sure the ears are inside and out of the way.
Pin around the top of the basket to attach the main basket and lining together. Sew together with a 1cm seam allowance. Unpin.
Pull the basket main through the hole in the bottom of the lining seam. This will turn the entire basket inside out, so the right sides show, and all the seams are hidden inside.
Stitch the hole in the lining closed by hand sewing or edge stitching it shut. - Add the vinyl bunny face to your basket if you have a Cricut machine. Head to my Cricut project and cut out the vinyl following the project prompts.
Once the vinyl is cut out, place it onto your basket in the centre and press it on with the Cricut easy press iron.
Notes
- You could add personalised names to the bunny ears for a special touch.
- Don't skip the interfacing! This stiffens the fabric, so it's not floppy.


Just curious , could you use fusible fleece for the ears? Your pattern is lovely
Hi Joanne, yes thats a lovely idea to use fusible fleece. Thank you! Enjoy sewing it 🙂 – Mak