This simple, beginner-friendly Christmas tree skirt pattern quickly sews together in less than an hour. It’s a fun and festive project perfect to spruce up your Christmas tree for the holiday season.
Last year, I came across a warm and cosy boucle blanket from my local Kmart that I knew would be perfect as a Christmas tree skirt. It reminded me of snow, and I couldn’t resist buying it.

However, as we weren’t planning to be home for Christmas, I didn’t bother sewing this project. But this year, things are different, and we will be home for Christmas. So, I sat down and planned out this project, ready to create a beautiful Christmas tree skirt.
As the Christmas season approaches, I look forward to creating festive decorations that bring cheer and joy to my home. It’s wonderful to create beautiful Christmas stockings and handmade decorations that add a personal touch to the season’s festivities.
I love taking the time to create these decorations, as it allows me to relax and get into the holiday spirit. Choosing materials, designing each piece, and bringing it all to life is so much fun!

As an Amazon Associate, I earn from qualifying purchases. Read my full disclosure here.
Why You Will Love This Christmas Tree Skirt Project

What is the Best Fabric to Use for a Christmas Tree Skirt?
If you are new to sewing, I recommend starting with quilting cotton or cotton poplin. These fabrics are easier to work with, especially when dealing with curved seams that can easily stretch and distort out of shape.
I chose a boucle-like fabric for my project, which was quite fiddly and messy. It was falling apart in some places, so I had to be extra careful while pinning and sewing it together, taking my time. This would be a very challenging and unenjoyable task for a beginner.
If you have sewing experience and are comfortable with a challenge, then have fun and experiment with some other fabrics like velvet, boucle, linen or even faux fur!

Materials & Tools You Will Need
1.4m x 1.4m Outer fabric
1.4m x 1.4m Lining fabric
Ribbon – 4 x 45cm lengths (1.8m total)
Tape measure
Chalk
Pins
Fabric shears
Thread
Sewing machine
Iron
How to Make a Christmas Tree Skirt
Step 1 – Fold your fabric
To start with, take your outer fabric and fold it into four equal sections by folding it over once and then folding it over itself again. This will give you two folded sides and two open sides.
Repeat the same process for the lining fabric.

Step 2 – Measure the Christmas tree skirt pattern
Instead of printing a physical pattern, you can use a tape measure, chalk, and pins to plot the pattern onto the outer fabric. This is a quick and easy process.
To create a small curved seam, measure 10cm at the corner of the two folded sides, starting at the edge. Pin or mark the measurement with chalk, then continue marking 10cm from the corner in 2-4cm increments until you reach the other side.
Carefully join the markings together.

To form the largest curve of the Christmas tree skirt, measure 55cm down from the first curve, starting at one side. Continue marking 55cm in 4cm increments until you hit the other side. Then, carefully join the markings together to form a curve.

Step 3 – Cut out the fabric
Once you have marked the pattern for the Christmas tree skirt, start cutting it out along both curved lines.


Use the cut-out outer fabric as a template to cut out the lining fabric. Place the outer fabric on top of the lining fabric, ensuring that the folded edges match up perfectly.
Carefully cut around the outer fabric.


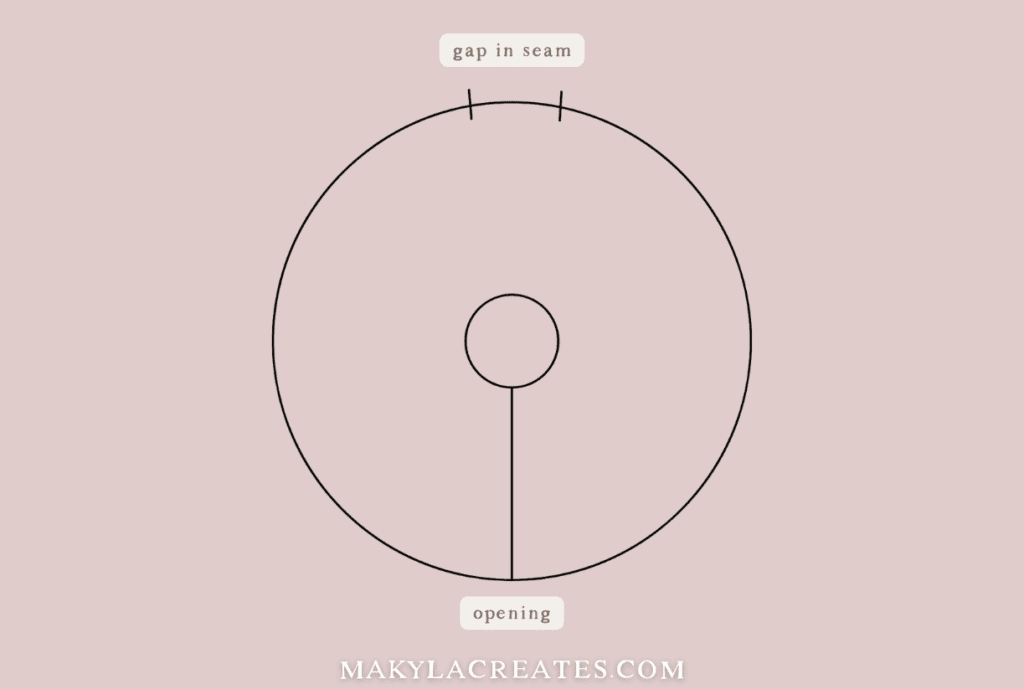
To create an opening in the tree skirt, one folded edge must be cut open in the outer and lining fabric.
It doesn’t matter which edge you choose to cut.

Step 4 – Add the ties
Cut the ribbons into 4 x 45cm lengths.
Pin one 11cm down from the small curve and one 20cm down from the bottom of the first ribbon on the outer fabric edges.
Repeat for the other side.
Tip: If the ribbon has a wrong and right side, place it wrong side up on the outer fabric.

Step 5 – Join the lining and outer fabric together
It’s now time to merge the two layers together. Begin by laying the outer fabric right side up and place the full circle flat with the open edges touching.
Then, lay the lining fabric on top of it. Take your time to align the two layers properly and pin them together all around the circumference.

Next, sew the layers together with a 1cm seam allowance, but leave a 15cm gap in the seam. As you sew, remove the pins.
Finally, snip into the smaller curved seam and the corners. This helps the curve sit nicely.

Step 6 – Turn through
Pull the fabric through the gap in the seam to turn it right side out. Then, carefully adjust the corners and curves before pressing everything in place with an iron.
Step 7 – Close the seam opening
Pin the opening of the seam together and then either edgestitch it or use hand stitching to close it securely.
Now, you can place it around your Christmas tree base!
Christmas Tree Skirt Pattern

If you are looking to create a Christmas tree skirt without using a printable pattern, you can learn how to sew one quickly in less than an hour. This is a fun and festive project that is perfect to spruce up your Christmas tree for the holiday season.
Materials
- 1.4m x 1.4m Outer fabric
- 1.4m x 1.4m Lining fabric
- Ribbon – 4 x 45cm lengths (1.8m total)
Tools
- Tape measure
- Chalk
- Pins
- Fabric shears
- Thread
- Sewing machine
- Iron
Instructions
- Fold your fabric
To start with, take your outer fabric and fold it into four equal sections by folding it over once and then folding it over itself again. This will give you two folded sides and two cut sides. Repeat the same process for the lining fabric. - Measure the Christmas tree skirt pattern
Instead of printing a physical pattern, you can use a tape measure, chalk, and pins to plot the pattern onto the outer fabric. This is a quick and easy process.
To create a small curved seam, measure 10cm at the corner of the two folded sides, starting at the edge. Pin or mark the measurement with chalk, and then continue marking 10cm from the corner in 2-4cm increments until you reach the other side. Carefully join the markings together.
Similarly, to form the largest curve of the Christmas tree skirt, measure 65cm at the corner of the two folded sides, starting at one end. Continue marking 65cm from the corner in 4cm increments until you hit the other side. Then, carefully join the markings together. - Cut out the fabric
Once you have marked the pattern for the Christmas tree skirt, start cutting it out along both curved lines.
Use the cut-out outer fabric as a template to cut out the lining fabric. Place the outer fabric on top of the lining fabric, ensuring that the folded edges match up perfectly. Carefully cut around the outer fabric.
To create an opening in the tree skirt, one folded edge needs to be cut open in both the outer and lining fabric. It doesn't matter which edge you choose to cut. - Add the ties
Cut the ribbons into 4 x 45cm lengths. Pin them 11cm down from the small curve and 20cm down from the bottom of the first ribbon on the outer fabric edges.
Tip: If the ribbon has a wrong and right side, place it wrong side up on the outer fabric. - Join the lining and outer fabric together
It's now time to merge the two layers together. Begin by laying the outer fabric right side up and place the full circle flat with the open edges touching. Then, lay the lining fabric on top of it. Take your time to align the two layers properly and pin them together all around the circumference.
Next, sew the layers together with a 1cm seam allowance, but leave a 15cm gap in the seam. As you sew, remove the pins.
Finally, clip the smaller curved seam and the corners. - Turn through
Pull the fabric through the gap in the seam to turn it right side out. Then, carefully adjust the corners and curves before pressing everything in place with an iron. - Close the seam opening
Pin the opening of the seam together and then either edgestitch it or use hand stitching to close it securely. Place it around your Christmas tree base!
Notes
What is the Best Fabric to Use for a Christmas Tree Skirt?
If you are new to sewing, I recommend starting with quilting cotton or cotton poplin. These fabrics are easier to work with, especially when dealing with curved seams that can easily stretch and distort out of shape. If you have sewing experience and are comfortable with a challenge, then have fun and experiment with some other fabrics like velvet, boucle, linen or even faux fur!
If you use a knit fabric like velvet, remember to use a knit sewing machine needle and zig-zag stitch to sew.


Hi! I’m in the USA, and I’ve converted the measurements from cm to inches, but I’m having a hard time understanding whether I’m cutting 4 pieces of ribbon, or if I’m needing it to be 4cm wide and I’m cutting two pieces? I imagine it’s the former because otherwise you wouldn’t be able to tie a bow with just one piece of ribbon on the one side, but I did want to get some clarity. Thank you! This is a beautiful piece and I’m excited to make it with some boucle type fabric I have in my stash.
Hi Haley, you’re totally right, it’s 4 pieces cut to 45cm (18″) long. Enjoy sewing! Thanks, Makyla