If you’re new to sewing, winding your sewing machine bobbin might seem daunting at first. But don’t worry, I’m here to help! In this step-by-step guide, I’ll show you the correct way to wind and thread your bobbin so you can confidently get started on your sewing projects.
The bobbin is a tiny but crucial part of the sewing machine, so it’s essential to understand how it works. The thread spool sits at the top of the machine and threads through the needle, while the bobbin sits in the bottom of the sewing machine and threads up through the bottom plate. Together, these two threads work in harmony to create rows of stitching.

But if the bobbin isn’t wound or threaded correctly, it can cause all sorts of problems. That’s why it’s best to understand the sewing machine’s relevant parts before you start. With this guide, you’ll be on your way to successful sewing in no time!
As an Amazon Associate, I earn from qualifying purchases. Read my full disclosure here.
Types Of Bobbins
To make sure everything runs smoothly, take a moment to check that you have the correct type of bobbin for your sewing machine before winding it up. The bobbins are included if you’ve recently bought a sewing machine, so there’s no need to worry about that.
If you have an older sewing machine, the instruction manual will confirm the correct bobbin type (these are online nowadays!). Most brands have PDF versions for download.
There are two types of bobbin options:
- Plastic
- Metal
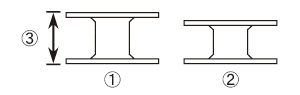
Not all bobbins are one size fits all. Make sure to use the correct bobbin for your sewing machine model. Check your instruction manual. For example, this Brother sewing machine guide suggests only using bobbins made for the machine model as they are higher than other types, as seen in the diagram below.
How To Wind A Bobbin Correctly
How to wind the bobbin starts at 7:09 in the video.

Step 1: Turn OFF the sewing machine.
Turn OFF the sewing machine before you begin for safety purposes.
Step 2: Place the Spool
Place the spool of thread onto the holder or pin at the top of the sewing machine.
Step 3: Remove the Bobbin
Remove the bobbin from the bobbin case at the bottom of the machine. If your machine is new, there shouldn’t be a bobbin in the case. Turn the handwheel towards you to remove the bobbin so the machine needle is positioned up. This will release the bobbin from the case.

Tip: Buying some extra bobbins is a smart move. This way, you won’t have to waste time winding and unwinding thread every time you switch colours. Plus, having filled bobbins on hand will help you sew faster.
Step 4: Place the Bobbin Onto the Winder Shaft.
New sewing machines usually have the bobbin winder on top of the sewing machine. It looks like a small dial with a metal pin coming out the side.
Place the bobbin onto this, and it will click when it’s on correctly.
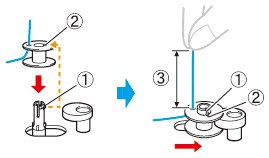
Step 5: Thread Through the Tension Guide
Bring the thread from the spool towards the back tension guide and loop it through the small groove or hook.
Then, place the thread around the pre-tension disk from the front towards the back. The disk looks like a screw.

Most new sewing machines have diagrams printed onto them (as seen on my Brother sewing machine in the image above). This is handy to use as a quick guide.
Step 6: Threading the Bobbin
Take the thread back towards the bobbin. Either wind the thread around the bobbin a few times or pass it through the small hole on it until it’s overhanging about 5cm.
Push the bobbin to the right to lock it into place. This action tells the sewing machine to spin the bobbin winder instead of moving the needle up and down.

Step 7: Turn ON the sewing machine
Switch the sewing machine back on and prepare to wind up the bobbin with the presser foot.
Step 8: Wind the Bobbin Up
Hold the thread coming through the bobbin upright and press down on the presser foot. The bobbin will begin to spin. Once a few spins of thread are on the bobbin, stop pushing on the presser foot and cut the thread tail off.
Continue to wind up the bobbin until it’s filled. Most sewing machines will automatically click off when they are filled.
Step 9: Remove the Bobbin
Pull the bobbin off the winder shaft and cut the thread.
Now you can place the bobbin back into the bobbin case and sewing machine ready to be threaded up.
What’s next? Learn how to thread up your sewing machine, so you can start sewing!
What is a Bobbin Case?
A bobbin case is a piece of the sewing machine that the bobbin sits inside. Some sewing machines, like older and industrial models, use a bobbin case.

A bobbin case is removed from the sewing machine and holds the bobbin inside of it.

Most home sewing machines have a built-in bobbin case that doesn’t get removed from the sewing machine. Just the bobbin comes out like my Brother sewing machine below.

Helpful Bobbin Tools
You may prefer a separate tool to wind up your bobbins. Below is a handy tool if you don’t want to unthread your sewing machine every time a bobbin runs out.
You can also find great packs of spare bobbins with cases to keep things nice and tidy in your sewing room.


More Sewing Tutorials For Beginners
- Learn How to Sew -Ultimate Guide to Sewing for Beginners
- Fabric Cutting – How to Cut Fabric Correctly
- Grainline – What is the Grainline of Fabric in Sewing & Why is it important?
- Types of Fabrics and Materials with Names and Pictures
- Seams – How to Sew a Plain and Open Seam
How to Wind a Bobbin for Beginners

Follow this step-by-step tutorial to easily wind your sewing machine bobbin and start sewing in no time!
Materials
- Thread
Tools
- Bobbin
- Sewing machine
Instructions
- Turn OFF the sewing machine before you begin for safety purposes.
- Place the spool of thread onto the holder or pin at the top of the sewing machine.
- Remove the bobbin from the bobbin case at the bottom of the machine. If your machine is new, there shouldn’t be a bobbin in the case. Turn the handwheel towards you to remove the bobbin so the machine needle is positioned up. This will release the bobbin from the case.
- New sewing machines usually have the bobbin winder on top of the sewing machine. It looks like a small dial with a metal pin coming out the side. Place the bobbin onto this, and it will click when it's on correctly.
- Bring the thread from the spool towards the back tension guide and loop it through the small groove or hook. Then, place the thread around the pre-tension disk from the front towards the back. The disk looks like a screw. Most new sewing machines have diagrams printed onto them (as seen on my Brother sewing machine in the image above). This is handy to use as a quick guide.
- Take the thread back towards the bobbin. Either wind the thread around the bobbin a few times or pass it through the small hole on it until it's overhanging about 5cm. Push the bobbin to the right to lock it into place. This action tells the sewing machine to spin the bobbin winder instead of moving the needle up and down.
- Switch the sewing machine back on and prepare to wind up the bobbin with the presser foot.
- Hold the thread coming through the bobbin upright and press down on the presser foot. The bobbin will begin to spin. Once a few spins of thread are on the bobbin, stop pushing on the presser foot and cut the thread tail off. Continue to wind up the bobbin until it's filled. Most sewing machines will automatically click off when they are filled.
- Pull the bobbin off the winder shaft and cut the thread. Now you can place the bobbin back into the bobbin case and sewing machine ready to be threaded up.
- What's next? Learn how to thread up your sewing machine, so you can start sewing!
Notes
Not all bobbins are one size fits all. Make sure to use the correct bobbin for your sewing machine model. Check your instruction manual.
It’s a great idea to purchase a few extra bobbins so you don’t have to unwind one when you change thread colours. It also makes it faster to sew when you have filled bobbins ready to go.
What is a bobbin case? A bobbin case is the piece of the sewing machine that the bobbin sits inside of. Some sewing machines like older and industrial models use a bobbin case.


