Knowing how to gather stitch material is a fabulous skill to learn if you want to make ruffles for garments or home sewing projects. Ruffles are a playful and relaxed detail to add to your sewing projects that are simple, and fun to sew!

Sewing is a craft that requires learning many new techniques, such as sewing simple seams, sewing on a button, shirring fabric, hemming garments, or sewing French seams.
Learning how to gather fabric is another wonderful and useful sewing technique to have under your sewing belt. Gathering can look intimidating, but I can assure you it’s simple and fun to sew once you get the process down.
I love to add ruffles to almost everything I sew. I just love them so much. I’ve sewn ruffles onto my pillowcases, cushion covers, wrap skirts, off-the-shoulder tops, and they are even a design feature on my super popular sewing patterns, the Chloe and Dua dress.
How to Add Ruffles to Any Sewing Project
The biggest confusion around ruffles is knowing how long the fabric needs to be cut. This is important to understand because it will affect the fullness of the finished ruffles.
More length will mean fuller, gathered ruffles. Less length will mean sparser, less gathered ruffles.

So how do you know what the correct length is to cut for your project?
Ruffle Cutting Guide
Measure the seam you will be attaching the ruffle to, then follow this equation:
seam length x 1.5 + 2cm(seam allowance) = ruffle length
This equation can be adjusted according to the ruffle fullness you want to achieve.
seam length x 2 + 2cm(seam allowance) = ruffle length (fuller ruffle)
I recommend sampling small pieces of your fabric to decide what fullness you like. I personally like to double my ruffle length because I love the detail.
Different fabrics will work differently. Lighter-weight fabrics like cotton poplin or silk would work well with more fullness, but thicker linens may not. That’s why it’s good to sample first.
The width of the ruffle will also depend on what look you are going for. The wider the fabric, the wider the ruffle will be.
You also need to consider how this ruffle will be hemmed.
In my wrap skirt tutorial, I show you how to create a hemmed ruffle, which is one layer of fabric with the bottom hemmed. In this tutorial, I will be showing you how to sew a ruffle that is instead folded in half. This style is perfect for slip covers or cushion covers.

To create a folded ruffle, follow this equation to work out the width:
finished width x 2 + 2cm(seam allowance) = ruffle width
Now you can cut out the ruffle. It will look like a long rectangle.
Tip: If the ruffle is super long and you can’t cut it in one length, don’t panic. Just cut more pieces and sew them together to create the right length.
How To Sew Gather Stitching To Make Ruffles
Join the ruffles’ rightsides together if you have cut multiple short pieces. I just sewed a 1cm seam to attach them together and pressed the seam open flat.

Fold the ruffle in half lengthways, wrong sides together and iron to crease.

Set the sewing machine stitch length to 4-5 or the longest stitch length. This creates longer stitches in the fabric. Pull the bottom and top threads towards the back of the sewing machine. Make sure the thread is at least 10cm long.

Hold the thread tails towards the back of the sewing machine, then start to sew 5mm from the cut edges of the fabric (remember to keep the ruffle folded, which means you will be sewing through 2 layers of fabric). Do not back tack, just keep sewing.
Sew all the way to the end of the ruffle, then pull the fabric out from under the presser foot. Pull the thread out 10cm and cut. You want to have thread tails hanging on both ends.
Go back to the first stitch and repeat the last two steps, but sew 5mm from the first row of stitching. You are now sewing a second row of gather stitching.

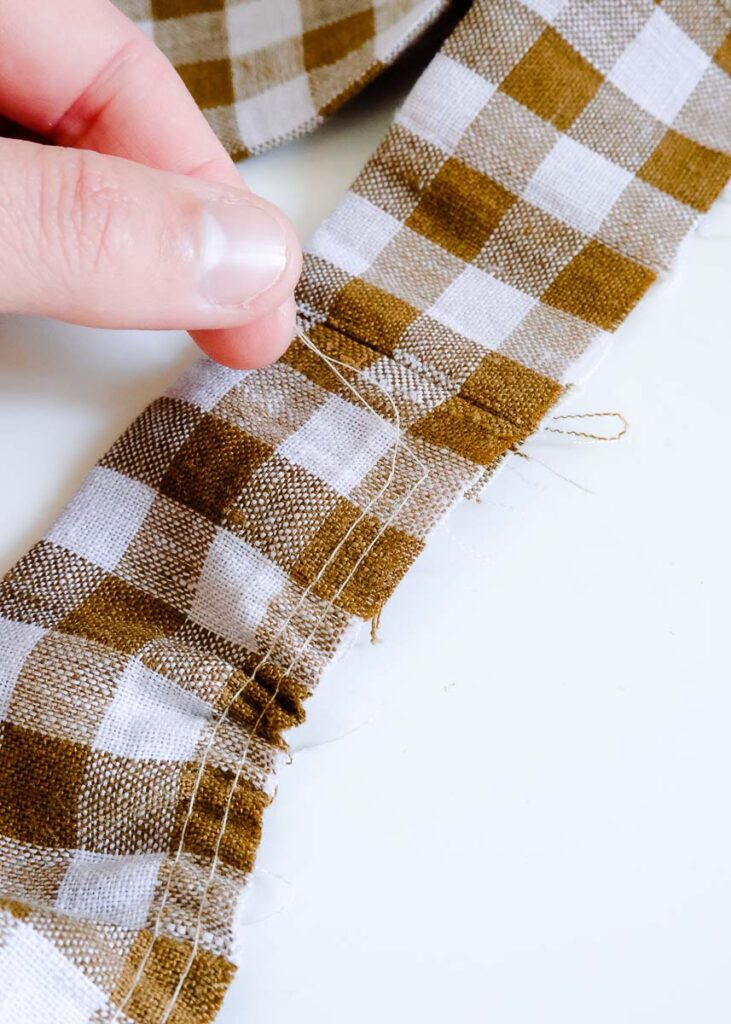
At one of the ends, grab the top threads. Begin to pull them while pushing the fabric away from you. The fabric will begin to gather. Keep gathering it until it’s the length of the seam you are attaching it to.
Tip: Gather from one side to halfway along the ruffle. Then start gathering from the other side. It can become too difficult to try to gather from one side if your ruffle is long.


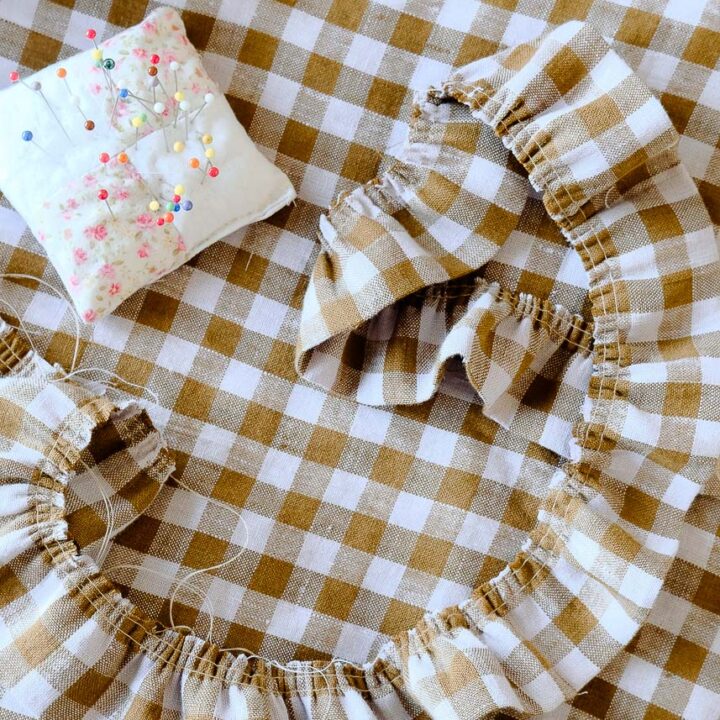
Once the ruffle has been gathered to the correct length, it can be attached to the seam of your garment or cushions.
Pin the ruffle to the seam, rightsides together. Use as many pins as you need to get the ruffle sitting in the correct place.
When you start sewing, sew the seam on the left side of the second row of gather stitching. This will hide the gather stitching inside the seam. If it is showing on the outside of your sewing project, just cut it and remove the thread.


I love sewing ruffles and adding them to any sewing project that I can. Their playfulness brings me joy. I hope I have inspired you to try sewing, gathering, and stitching to make ruffles for your sewing projects.
Check Out My Other Sewing Tutorials
If you tried this tutorial and enjoyed it or found it helpful, please consider leaving a 5-star review below. It’s so appreciated.
How To Gather Stitch To Make Ruffles
Knowing how to gather stitch material is a fabulous skill to learn if you want to make ruffles for garments or home sewing projects. Ruffles are a playful and relaxed detail to add to your sewing projects that are simple, and fun to sew!
Materials
- Thread
- Fabric
Tools
- Sewing Machine
- Fabric Scissors
Instructions
- Measure the seam you will be attaching the ruffle to then follow this equation: seam length x 1.5 + 2cm(seam allowance) = ruffle length
- To create a folded ruffle follow this equation to work out the width: finished width x 2 + 2cm(seam allowance) = ruffle width
- Now you can cut out the ruffle. It will look like a long rectangle.
- Join the ruffles rightsides together if you have cut multiple short pieces. I just sewed a 1cm seam to attach them together and pressed the seam open flat.
- Fold the ruffle in half lengthways, wrongsides together and iron to crease.
- Set the sewing machine stitch length to 4-5 or the longest stitch length. This creates longer stitches in the fabric. Pull the bottom and top thread towards the back of the sewing machine. Make sure the thread is at least 10cm long.
- Hold the thread tails towards the back of the sewing machine then start to sew 5mm from the cut edges of the fabric (remember to keep the ruffle folded, this means you will be sewing through 2 layers of fabric). Do not back tack, just keep sewing.
- Sew all the way to the end of the ruffle then pull the fabric out from under the presser foot. Pull the thread out 10cm and cut. You want to have thread tails hanging on both ends.
- Go back to the first stitch and repeat the last two steps but sew 5mm from the first row of stitching. You are now sewing a second row of gather stitching.
- At one of the ends, grab the top threads. Begin to pull them while pushing the fabric away from you. The fabric will begin to gather up. Keep gathering it until it’s the length of the seam you are attaching it to.
- Once the ruffle has been gathered up to the correct length it can be attached to the seam of your garment or cushions.
- Pin the ruffle to the seam, rightsides together. Use as many pins as you need to get the ruffle sitting in the correct place.
- When you start sewing, sew the seam on the left side of the second row of gather stitching. This will hide the gather stitching inside of the seam. If it is showing on the outside of your sewing project just cut it and remove thread.
Notes
- The width of the ruffle will also depend on what look you are going for. The wider the fabric, the wider the ruffle will be.
- If the ruffle is super long and you can’t cut it in one length, don’t panic. Just cut more pieces and sew them together to create the right length.
- Different fabrics will work differently. Lighter weight fabrics like cotton poplin or silk would work well with more fullness but thicker linens may not. That’s why it’s good to sample first.
- Gather from one side to halfway along the ruffle. Then start gathering from the other side. It can become too difficult to try gather from the one side if your ruffle is long.


Hello! Thanks for letting my know I have just added the rss feed social icon to my site at the top and bottom of pages. Let me know if you still have any trouble 🙂
Thank you so much! At this stage im not planning on having guest writers but maybe in the future.