Learn how to sew a polished French seam in less than 5 minutes with this simple tutorial. It’s a great way to hide raw edges and give your garment a high-end look inside and out. Plus, it’s perfect for delicate fabrics that tend to fray easily.
In this post, I’ll guide you through how to sew a French seam step-by-step and share some handy tips and tricks. You’ll also learn why this technique is so popular among sewers who want to up their game.

As an Amazon Associate, I earn from qualifying purchases. Read my full disclosure here.
This blog post was originally posted on 26 June 2021. It has since been updated with more content.
What Is A French Seam?
Are you curious about what a French seam is? Well, it’s actually a pretty neat trick used to hide the rough edges of fabric within a piece of clothing.
This technique seamlessly blends fabrics together, especially when working with delicate or sheer materials.
French seams are a great finishing option if you don’t own a serger and want to finish your garment seams off perfectly. This technique is perfect for delicate fabrics.
Why Choose French Seams?
- Professional Finish – French seams are a great way to give your garments a professional and high-end look. Unlike regular seams, French seams hide all the raw edges within the seam allowance, giving your clothes a sleek and polished finish.
- Stops Fraying – If you’re handling delicate fabrics like silk, chiffon, or organza, you may notice that they can easily start to fray. To help prevent this, you can use French seams to encase the edges of the fabric. This can help reduce fraying and keep your garment looking great for longer.
- Good for Sheer Fabrics – Working with transparent or sheer fabrics can sometimes be difficult because of their see-through quality. However, there’s a solution! You can use French seams to ensure the seam allowance doesn’t show through the fabric, keeping your garment looking elegant and polished.
- Clean Finish – They are a great way to make the inside of your garment look neat and clean. Plus, they make your clothes more comfortable to wear and can reduce the chances of irritation from exposed raw edges.
When Should You Use a French Seam?
French seams are great for lightweight fabrics, as they provide a neat finish without any raw edges showing. They’re also ideal for sheer fabrics or fabrics that tend to fray easily.
If you’re working with a delicate or see-through material, a French seam can add an extra layer of protection and make your garment look more professional. Additionally, French seams are commonly used in lingerie and other intimate apparel, as they create a seamless and elegant appearance.
- Lingerie – delicate silk and lace underwear
- French knickers
- Silk bias-cut garments
- Silk or lace cami
- Sheer garments
- Pillowcases
What Are The Cons Of A French Seam?
Sewing French seams might not be the easiest or quickest way to go, compared to other types of seams. But it’s totally worth the extra effort if you’re looking for a polished and professional finish.
Just keep in mind that French seams require a bit more precision and attention to detail. And because they involve encasing the raw edges, they can create a bulkier look. So, it’s really up to you and the fabric you’re working with to decide if French seams are the way to go.
Tools & Materials
- Small pieces of fabric
- Polyester thread
- Sewing machine
- Fabric shears
- Pins
- Iron and ironing board
How To Sew A French Seam
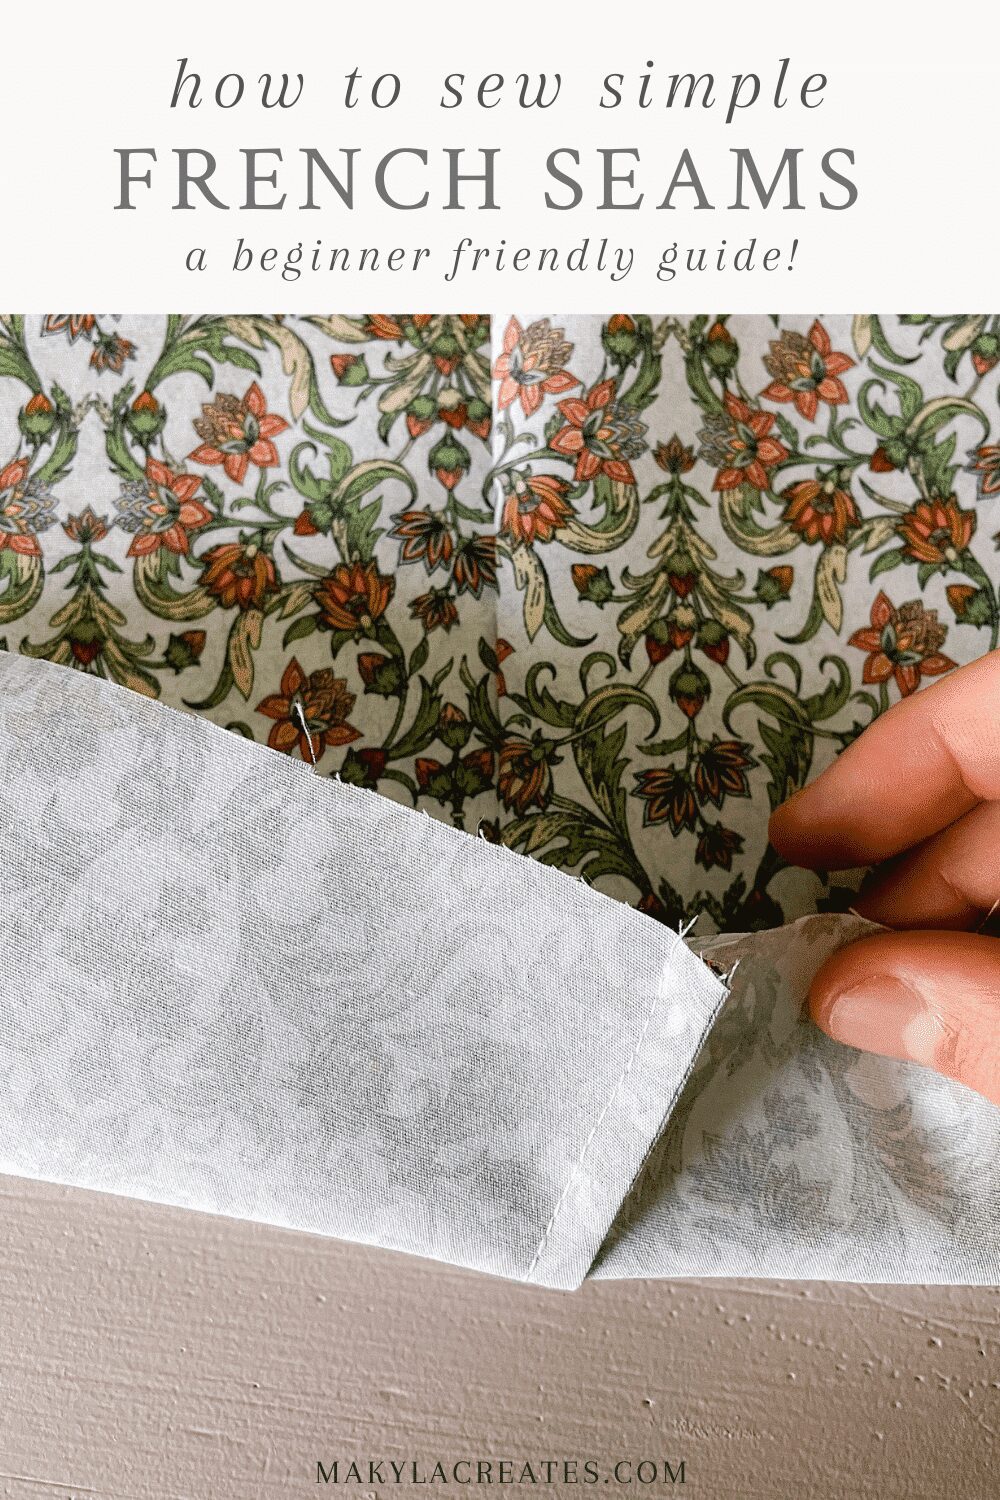
Step 1. Place the wrong sides of the fabric together
French seams require sewing with the wrong sides of the fabric together first. Traditional sewing of seams requires the right sides of the fabric to be together. Keep this in mind when sewing French seams so you don’t get too confused.

Step 2. Sew the French seam
Keep the seam allowance 6mm less than the allowance included in the pattern.
If you use a sewing pattern with a 1cm seam allowance, I recommend adding 2mm. This will allow you to have enough seam width for the French seam.
Seam Width Examples:
- 12mm seam allowance = Sew a 6mm seam leaving 6mm of the seam.
- 15mm seam allowance = Sew a 9mm seam leaving 6mm of the seam.

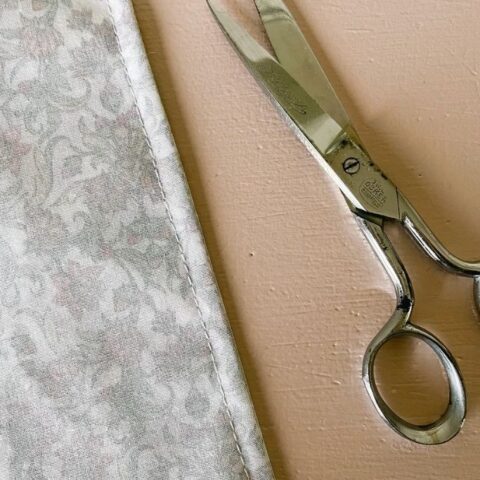
Step 3. Trim the seam allowance
Using cutting tools of your choice, like sharp fabric shears or a rotary cutter, ruler, and mat, trim back the seam allowance leaving about 3mm from the stitching line.

Press open the seam and then fold the right sides together and press.


Step 4. Sew the final stitching line
Sew 6mm from the folded side of the fabric with the wrong sides together. This will enclose the raw edges of the previous seam inside and create a nice tidy French seam.

Unfold and press everything nice and flat on the right side. You will notice that the seam allowance is now on the wrong side of the fabric.

Can You Use French Seams on Curved Seams?
You can French seam curved seams, but it can be tricky. I would only recommend this if you have already practised French seaming.
If French seaming a curved seam confuses you – trust me, I still get confused myself, you can bind the seam instead. Bias binding is a great alternative to French seams as you won’t need to sew the seam wrong sides together. Then you won’t risk making mistakes.
I recommend cutting out some practice curved seams, like a sleeve and armhole piece, before jumping into an actual garment to get your skills up to scratch first.
Tips and Tricks For Sewing French Seams
Choose Suitable Fabrics
French seams work best with lightweight and delicate types of fabrics such as silk, chiffon, satin, and cotton voile. Avoid using thick or heavy fabrics as they may create too much bulk.
Practice On Scrap Fabric
If you’re new to sewing French seams, practice on scrap fabric (like I’ve done for this tutorial) before working on your main project to gain confidence and perfect your technique.
Use A Thin Needle
When sewing delicate fabrics, opt for a fine and sharp needle to avoid leaving visible holes in the fabric.
Press Carefully
Press the seams gently with a low heat setting on your iron to avoid damaging delicate fabrics.
Plan Ahead
Consider the seam finishing while cutting out your fabric pieces to ensure the French seams are applied to the appropriate seams. Many sewing patterns, like my Makyla Create’s patterns, only include 1cm seam allowances, so planning ahead allows you to add the extra 2mm.
To Sum Up French Seams
In conclusion, French seams are a timeless and elegant way to finish your garments. They provide a clean and polished look inside and outside the garment, making it comfortable and long-lasting. With a little practice and attention to detail, you can master the art of sewing French seams and elevate your sewing projects to a new level of sophistication. Happy sewing!
How to Sew French Seams
Learn how to sew a polished French seam. It's a great way to hide raw edges and give your garment a high-end look inside and out. Plus, it's perfect for delicate fabrics that tend to fray easily.
Materials
- Small pieces of fabric
- Polyester thread
Tools
- Sewing machine
- Fabric shears
- Pins
- Iron and ironing board
Instructions
- Place the wrong sides of the fabric together
French seams require sewing with the wrong sides of the fabric together first. Traditional sewing of seams requires the right sides of the fabric to be together. Keep this in mind when sewing French seams so you don't get too confused. - Sew the French seam
Keep the seam allowance 6mm less than the allowance included in the pattern. If you use a sewing pattern with a 1cm seam allowance, I recommend adding 2mm. This will allow you to have enough seam width for the French seam.
12mm seam allowance = Sew a 6mm seam leaving 6mm of the seam.
15mm seam allowance = Sew a 9mm seam leaving 6mm of the seam. - Trim the seam allowance
Using cutting tools of your choice, like sharp fabric shears or a rotary cutter, ruler, and mat, trim back the seam allowance leaving about 3mm from the stitching line. Press open the seam and then fold the right sides together and press. - Sew the final stitching line
Sew 6mm from the folded side of the fabric with the wrong sides together. This will enclose the raw edges of the previous seam inside and create a nice tidy French seam. Unfold and press everything nice and flat on the right side. You will notice that the seam allowance is now on the wrong side of the fabric.
Notes
Choose Suitable Fabrics
French seams work best with lightweight and delicate fabrics such as silk, chiffon, satin, and cotton voile. Avoid using thick or heavy fabrics as they may create too much bulk.
Practice On Scrap Fabric
If you love sewing, you'll know there's nothing like a polished French seam. It's a great way to hide raw edges and give your garment a high-end look inside and out. Plus, it's perfect for delicate fabrics that tend to fray easily.
If you're new to sewing French seams, practice on scrap fabric (like I've done for this tutorial) before working on your main project to gain confidence and perfect your technique.
Use A Thin Needle
When sewing delicate fabrics, opt for a fine and sharp needle to avoid leaving visible holes in the fabric.
Press Carefully
Press the seams gently with a low heat setting on your iron to avoid damaging delicate fabrics.
Plan Ahead
Consider the seam finishing while cutting out your fabric pieces to ensure the French seams are applied to the appropriate seams. Many sewing patterns, like my Makyla Create's patterns, only include 1cm seam allowances, so planning ahead allows you to add the extra 2mm.


