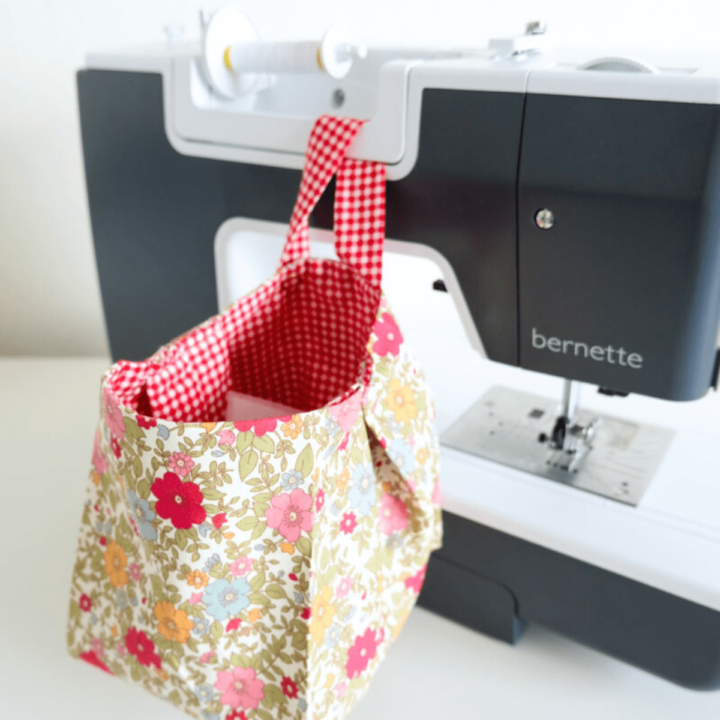
Have you ever had a sewing project where the measurements didn’t quite work? It happens to the best of us! I recently made a mistake when cutting out my fabric and ended up with dimensions that were all wrong. But I didn’t want to waste my fabric and start over again, so instead, I turned my mistake into something useful. I made this fabric basket into a DIY trash can for my sewing machine that I can hang on the handle.

This DIY trash can has been helpful in keeping my workspace clean and tidy. It’s perfect for collecting small fabric scraps and threads while sewing. You could also use this as a car trash can that can hang from the seat headrest for small rubbish items.

If you are new to sewing, I recommend reading my Learn How to Sew -Ultimate Guide to Sewing for Beginners blog. This will help you get started sewing quickly and easily!
As an Amazon Associate, I earn from qualifying purchases. Read my full disclosure here.
Tools & Materials You’ll Need:
- 2 Cotton fat quarters (1x outer, 1x lining)
- 50 x 53cm (18 x 21 inches) medium-weight fusible interfacing
- 1 metal snap fastener set
- Matching thread
- Pins
- Sewing machine
- Fabric shears
- Iron

How to Make a DIY Trash Can
Step 1: Cut out the fabric
Now, let’s cut the fabric pieces for our thread catcher. Fold the fat quarters in half and cut as the measurements below:
Outer fabric: Cut 1 pair of rectangles measuring 24cm x 30cm (9.4 x 11.8 inches).
Lining fabric: Cut 1 pair of rectangles measuring 24cm x 30cm (9.4 x 11.8 inches).
Interfacing: Cut 1 pair of rectangles measuring 24cm x 30cm (9.4 x 11.8 inches).

Step 2: Fuse the interfacing to the outer fabric
Place the interfacing pieces glue-side down on the wrong side of the outer fabric rectangles. Follow the manufacturer’s instructions for fusing the interfacing. I like to place a piece of scrap fabric on top of the interfacing and press on with my mini iron.
This step will give your DIY trash can structure and stability, ensuring it holds its shape over time.

Step 3: Sew the outer and lining together
With the right sides facing each other, pin the outer fabric and lining fabric rectangles together. Make sure to align the edges neatly. Sew around the sides and bottom of the fabrics, leaving the top open. Use a 1cm (0.4 inches) seam allowance and backstitch at the beginning and end to secure the stitches.
On the left side of the lining piece, leave a 4cm (1.6 inches) gap in the seam.


Step 5: Sew the box corners
The corners are sewn as box corners to get the three-dimensional shape for your DIY trash can. Start by pinching one corner of the fabric and aligning the side and bottom seams on the lining. Pin in place.
Sew across the seams with a 1cm (0.4 inches) seam allowance. Repeat this process for the outer layer.

Step 6: Hanging Strap
Cut a fabric strip measuring 6cm (2.4 inches) wide and 15cm (5.9 inches) long. Fold the strip in half lengthwise, with the right sides facing each other, and sew along the long edge. Turn the strap right side out and press it flat.

Fold one end over 5mm (0.2 inches) twice and edgestitch in place.

Attach the unhemmed strap to the side, about 10cm (3.9 inches) from the side seam. Sew it securely in place.

Step 7: Join the layers
Place the outer inside the lining. The outer layer should be right sides out, and the lining wrong sides out so the right sides are touching each other. Sew around the top edge with a 1cm (0.4 inches) seam allowance.

Turn the trash can through the gap in the lining seam to the right side.

Edge stitch the lining seam closed.
Step 8: Attach the snap fastener
Grab the snap fastener and attach the snap side on the handle and the other on the basket 10cm (3.9 inches) from the other side of the side seam.


Step 9: Fold the side pleats
This is optional, but these side pleats help stabilise this fabric trash can.
Fold a box pleat on either side of the basket at the side seams by folding in 4cm on either side. Pin the pleats, then sew across the top to secure them.


And you’re done! Now you can hang this handy trash can on your sewing machine or car.
DIY Trash Can Conclusion
A small trash can in your sewing room can be very useful for catching threads or fabric scraps. If you prefer, you can hang this in your car as a trash can too! There are many uses for this fabric trash can.
More Easy Beginner Sewing Projects:
- How to Make a Pin Cushion
- DIY Sleep Mask with Free Pattern
- How to Make a Drawstring Bag
- How to Sew Scrunchies – 3 Ways with Free Pattern
- DIY Heating Pad for Microwave
- DIY Ruffle Check Cushions {Heather Taylor Inspired}
DIY Trash Can
Keep your car or sewing space clean and tidy with this quick and easy diy trash can sewing project, perfect for any sewing level!
Materials
- 2 Cotton fat quarters (1x outer, 1x lining)
- 50 x 53cm (18 x 21 inches) medium-weight fusible interfacing
- 1 metal snap fastener set
- Matching thread
Tools
- Pins
- Sewing machine
- Fabric shears
- Iron
Instructions
- Cut out the fabric
Now, let's cut the fabric pieces for our thread catcher. Fold the fat quarters in half and cut as the measurements below:
Outer fabric: Cut 1 pair of rectangles measuring 24cm x 30cm (9.4 x 11.8 inches).
Lining fabric: Cut 1 pair of rectangles measuring 24cm x 30cm (9.4 x 11.8 inches).
Interfacing: Cut 1 pair of rectangles measuring 24cm x 30cm (9.4 x 11.8 inches). - Fuse the interfacing to the outer fabric
Place the interfacing pieces glue-side down on the wrong side of the outer fabric rectangles. Follow the manufacturer's instructions for fusing the interfacing. I like to place a piece of scrap fabric on top of the interfacing and press on with my mini iron. This step will give your DIY trash can structure and stability, ensuring it holds its shape over time. - Sew the outer and lining together
With the right sides facing each other, pin the outer fabric and lining fabric rectangles together. Make sure to align the edges neatly. Sew around the sides and bottom of the fabrics, leaving the top open. Use a 1cm (0.4 inches) seam allowance and backstitch at the beginning and end to secure the stitches. On the left side of the lining piece, leave a 4cm (1.6 inches) gap in the seam. - Sew the box corners
The corners are sewn as box corners to get the three-dimensional shape for your DIY trash can. Start by pinching one corner of the fabric and aligning the side and bottom seams on the lining. Pin in place. Sew across the seams with a 1cm (0.4 inches) seam allowance. Repeat this process for the outer layers. - Hanging Strap
Cut a fabric strip measuring 6cm (2.4 inches) wide and 15cm (5.9 inches) long. Fold the strip in half lengthwise, with the right sides facing each other, and sew along the long edge. Turn the strap right side out and press it flat. Fold one end over 5mm (0.2 inches) twice and edgestitch in place. Attach the unhemmed strap to the side, about 10cm (3.9 inches) from the side seam. Sew it securely in place. - Join the layers
Place the outer inside the lining. The outer layer should be right sides out, and the lining wrong sides out so the right sides are touching each other. Sew around the top edge with a 1cm (0.4 inches) seam allowance. Turn the trash can through the gap in the lining seam to the right side. Edge stitch the lining seam closed. - Attach the snap fastener
Grab the snap fastener and attach the snap side on the handle and the other on the basket 10cm (3.9 inches) from the other side of the side seam. - Fold the side pleats
This is optional, but these side pleats help stabilise this fabric trash can. Fold a box pleat on either side of the basket at the side seams by folding in 4cm on either side. Pin the pleats, then sew across the top to secure them. And you're done! Now you can hang this handy trash can on your sewing machine or car.


