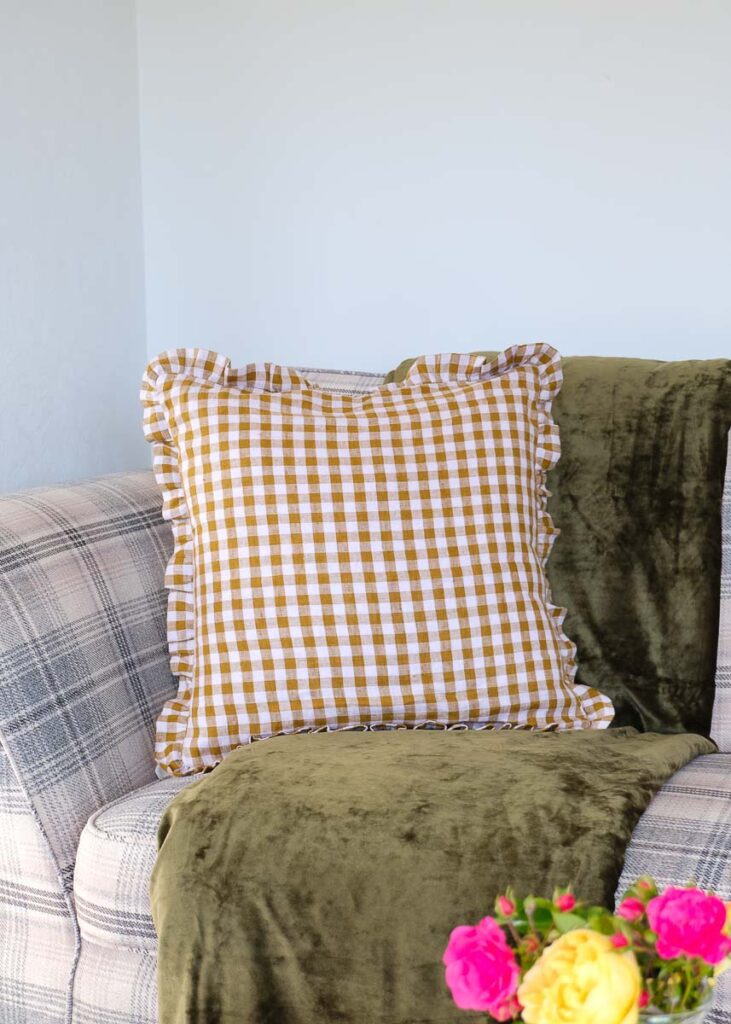
Bring a touch of charm to your home. Easy, charming, and affordable to make, these DIY ruffle check cushions are perfect for beginners.
Have you been admiring all the charming check ruffle cushions on Instagram lately? Because same! I’m OBSESSED! You probably know that I adore English cottage style interiors if you’ve been around here for a while. The fact that these cushions make me swoon is no surprise.
I just couldn’t justify spending $120 on one ruffle check cushion, plus shipping to New Zealand is always a problem. So off to my sewing room, I planned to make these scrumptious ruffle cushions.

We just bought our first house, so making new cushions seemed like a great idea. To avoid hefty moving costs, we sold our couch when we moved from the North to the South Island. We recently found a lovely second-hand check couch handmade in Manchester, UK, so these cushions seem to fit well.
Whenever I can, I sew stuff for my home like aprons and potholders because they’re easy to customise and you can be sure they’re of high quality. Plus, they make for fun afternoon sewing sessions when you don’t feel like sewing an entire dress.

Why You’ll Love these Ruffle Cushions:
- Super cute ruffle detail
- Affordable to make rather than buy
- Easy to customise to your style

As an Amazon Associate, I earn from qualifying purchases. Read my full disclosure here.
Materials and Tools List
This tutorial will make one ruffle check cushion.
- Sewing machine (my sewing machine that is amazing)
- Fabric scissors
- Tape measure
- Pins
- 1m Fabric
- Matching thread
- Feather cushion inner (50x50cm)
I purchased this beautiful brown and lilac linen cloth from Merchant and Mills.
How to Make a DIY Ruffle Pillow Cushion Case

Step One: Cut out fabric
Lay your fabric on a hard surface ready to cut out. Measure out a 52x52cm square with chalk. Cut this out – this is the front of the cushion.
Next, measure out two rectangles 39x52cm and 28x52cm – these are the back pieces of the cushion.
Now, measure out 2 longer rectangles for the ruffles at 10x148cm.

Tip: Use the full width of the fabric for the length of the ruffles. This will enable a smaller amount of extra fabric that will make the ruffles fuller.
Step Two: Join the ruffles together
Set up your sewing machine for straight sewing. Grab two ruffle pieces and place the short ends together with the right sides facing each other and pin. Sew along the edge with a 1cm seam allowance.
Repeat for the other ends, making sure the fabric is not twisted with pinning. This will create a circular ruffle piece.

Step Three: Gather the ruffles
Fold the ruffle in half lengthways (wrong sides together so the seams are hidden) and press with an iron to crease the ruffle edge. Steam works best here!
Set the sewing machine stitch length up high (about 4-5 or higher in length) and begin sewing 6mm from the raw edges of the ruffle. Make sure to sew through both layers of fabric here.

Continue sewing all the way around, then stop about 1cm before the stitching line starts. Hold on to the stitching line as you lift the sewing machine foot up. It will make a thread tail that you can pull to gather the stitches.
Sew another row of stitching 1cm from the raw edges of the ruffle to create a second row of gathers. If you sew two rows, the ruffles will gather more evenly.

Grab the two top threads and pull away from the rows of stitching. To get the gathering to happen, push the fabric away from you while pulling the threads towards you. Gather the ruffle just a little bit and we’ll fit it later.

Check out my detailed post on how to gather stitch to make ruffles if you need more information on this step or comment below, I’m happy to help!
Step Four: Hem the back panels
The 2 smaller rectangular pieces will make the back of the cushion. On both pieces fold up one edge (52cm side) 1cm to the wrong side of the fabric and press to crease. Fold up again 1cm so the raw fabric edge is hidden in the fold and press. Pin in place, then sew along the top edge to hem.
Step Five: Attach the ruffle to the front and back of the cushion case
Place the ruffle on top of the front cushion piece with the right side up and the raw edges matching. Here is where the gathers need to be pulled in more or loosened to fit along the sides of the cushion. Pin the ruffle in place as you go.

Tip: Use lots of pins so sewing is easier.
Once the ruffle is pinned, place the two back pieces on top. Pin the larger piece on first, hem in the middle of the cushion, with the right sides facing each other. Then pin the smaller back piece on top, hem in the middle of the cushion, with the right sides facing each other.
Sew around the outer edges with a 1cm seam allowance. This will be attaching the front, back and ruffle all together with one stitching line. Unpin all the pieces.
Step Six: Final iron press
Once the cushion is unpinned, turn it out to the right side. You should find the ruffle is beautifully sewn in between the front and back panels and the back opening is hemmed and looks like an envelope.
Give the entire ruffle cushion case a full iron over to press everything. Also, trim any visible threads.
Step Seven: Insert pillow
Now you can insert your pillow inner to complete your new ruffle cushion!
I made two of these and we have been thoroughly enjoying our new cushions on our secondhand couch. Making stuff by hand makes a house feel like a home, which is why I love sewing.
More Sewing Project Ideas:
Did you know I have an exclusive library for subscribers? Subscribe to my newsletter and get access to all my free sewing patterns, helpful resources, and printables.
If you made this ruffle cushion, I would appreciate you giving it 5 stars! I’d love to see what you are sewing if you tag me @makylacreates on Instagram.
Don’t forget to save this tutorial to Pinterest for later!
DIY Ruffle Check Cushions {Heather Taylor Inspired}

Easy, charming, and affordable to make, these DIY ruffle check cushions are the perfect sewing project for beginners. Add country cottage charm to your home with these ruffle cushions.
Materials
- 1.5 metres fabric (Cotton or linen)
- Matching thread
- Feather cushion inner (50x50cm)
Tools
- Sewing machine
- Fabric scissors
- Tape measure
- Pins
- Iron
Instructions
- Cut out fabric
Lay your fabric on a hard surface ready to cut out. Measure out a 52x52cm square with chalk. Cut this out – this is the front of the cushion.
Next, measure out two rectangles 39x52cm and 28x52cm - these are the back pieces of the cushion.
Now, measure out 2 longer rectangles for the ruffles at 10x148cm. - Join the ruffles together
Set up your sewing machine for straight sewing. Grab two ruffle pieces and place the short ends together with the right sides facing each other and pin. Sew along the edge with a 1cm seam allowance.
Repeat for the other ends, making sure the fabric is not twisted with pinning. This will create a circular ruffle piece. - Gather the ruffles
Fold the ruffle in half lengthways (wrong sides together so the seams are hidden) and press with an iron to crease the ruffle edge. Steam works best here!
Set the sewing machine stitch length up high (about 4-5 or higher in length) and begin sewing 6mm from the raw edges of the ruffle. Make sure to sew through both layers of fabric here.
Continue sewing all the way around, then stop about 1cm before the stitching line starts. Hold on to the stitching line as you lift the sewing machine foot up. It will make a thread tail that you can pull to gather the stitches.
Sew another row of stitching 1cm from the raw edges of the ruffle to create a second row of gathers. If you sew two rows, the ruffles will gather more evenly.
Grab the two top threads and pull away from the rows of stitching. To get the gathering to happen, push the fabric away from you while pulling the threads towards you. Gather the ruffle just a little bit and we'll fit it later. - Hem the back panels
The 2 smaller rectangular pieces will make the back of the cushion. On both pieces fold up one edge (52cm side) 1cm to the wrong side of the fabric and press to crease. Fold up again 1cm so the raw fabric edge is hidden in the fold and press. Pin in place, then sew along the top edge to hem. - Attach the ruffle to the front and back of the cushion case
Place the ruffle on top of the front cushion piece with the right side up and the raw edges matching. Here is where the gathers need to be pulled in more or loosened to fit along the sides of the cushion. Pin the ruffle in place as you go.
Once the ruffle is pinned, place the two back pieces on top. Pin the larger piece on first, hem in the middle of the cushion, with the right sides facing each other. Then pin the smaller back piece on top, hem in the middle of the cushion, with the right sides facing each other.
Sew around the outer edges with a 1cm seam allowance. This will be attaching the front, back and ruffle all together with one stitching line. Unpin all the pieces. - Final iron press
Once the cushion is unpinned, turn it out to the right side. You should find the ruffle is beautifully sewn in between the front and back panels and the back opening is hemmed and looks like an envelope.
Give the entire ruffle cushion case a full iron over to press everything. Also, trim any visible threads. - Insert pillow
Now you can insert your pillow inner to complete your new ruffle cushion!
Notes
- Use the full width of the fabric for the length of the ruffles. This will enable a smaller amount of extra fabric that will make the ruffles fuller.
- Check out my detailed post on how to gather stitch to make ruffles if you need more information on this step or comment below, I'm happy to help!
- Cotton and linen fabrics will work best for this sewing project.


The ads on this page make it very difficult to read the pattern. My webpage kept jumping around as ads popped up.
However, thank you for putting this up. It was very good instructions.
Can I do four cuts of 10×74? Instead of the two 10×148? My one yard fabric isn’t long enough.
Yes for sure. Just join the fabric together to make them longer after cutting 🙂 Thanks, Makyla