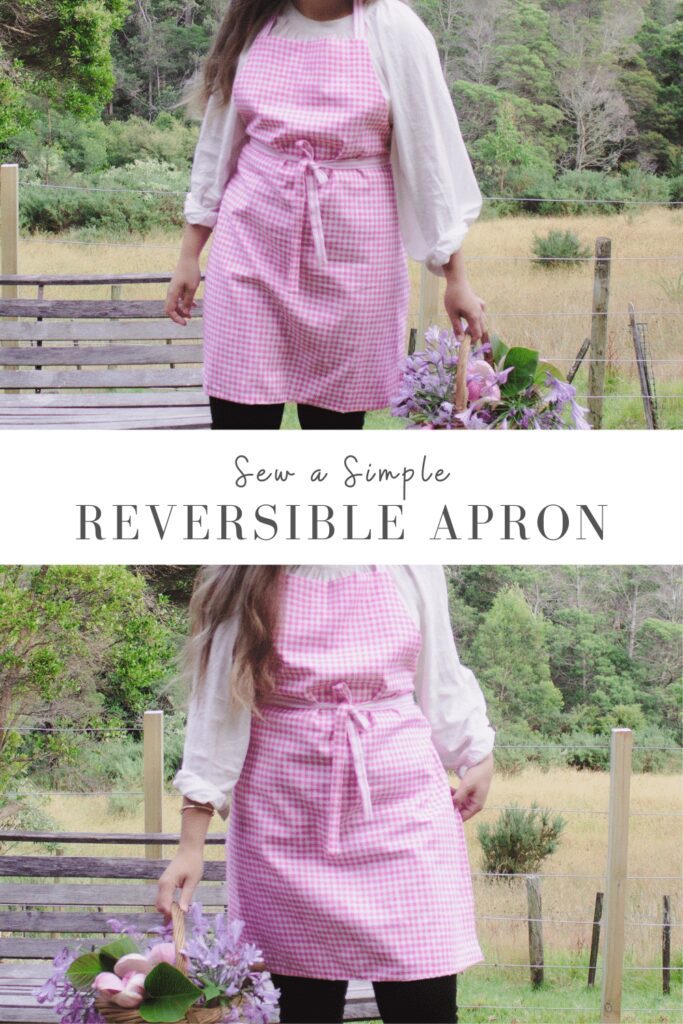
Learn how to make an apron that is beginner-friendly, simple, and quick to sew in under an hour. In this step-by-step tutorial, you’ll learn how to make a beautiful and practical reversible apron that will protect your clothing while in the kitchen.
As someone who loves spending time in the kitchen, I understand the frustration of getting oil or stains on my handmade garments. An apron getting dirty is much better than clothes I have spent hours sewing getting ruined!
This apron pattern is a fun afternoon sewing project to make, if you have kiddos, they may enjoy sewing this as a first project with you.
Handmade items like this apron make fantastic gifts! You could wrap a beautiful basket filled with homemade kitchen items like pot holders, drawstring bags, reusable paper towels, and some homemade natural all-purpose cleaner.
As an Amazon Associate, I earn from qualifying purchases. Read my full disclosure here.
This blog post was originally posted on 21 January 2021, it has since been updated with more content and images.
Why You Will Love this Apron Pattern
- Quick and easy to sew with the beginner-friendly sewing pattern.
- This apron is customisable to your favourite patterns and colours.
- Cheaper than buying a low-quality apron.
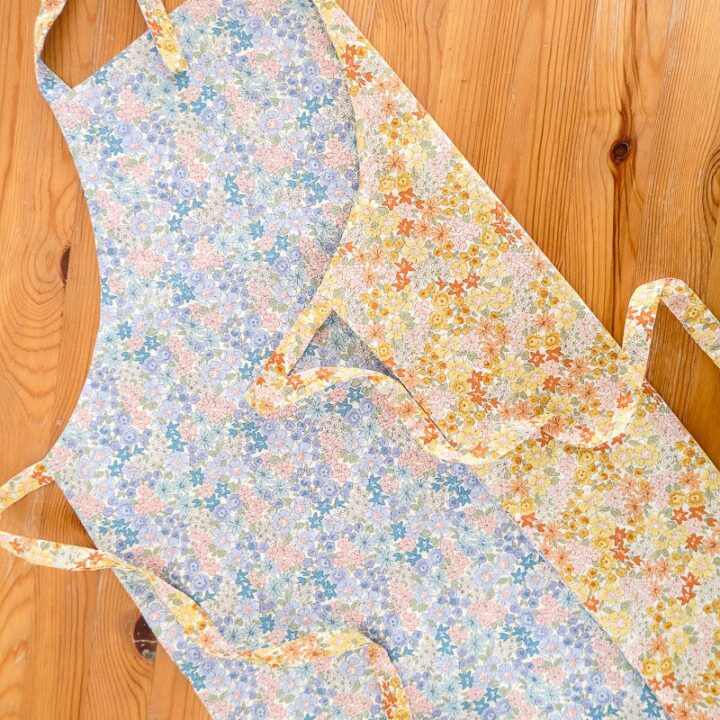
- This apron is reversible!
If you are new to sewing take a look at these helpful sewing articles:

Project Tips
- Play with contrasting fabrics – experiment with contrasting fabrics for each side of the apron. Especially helpful when you can’t decide what fabric to go with!
- Add functional pockets – Make your apron more functional by adding pockets to the front. This could just be a simple rectangle or square shape that is topstitched on. This detail adds charm and provides a convenient place to store small kitchen essentials.
- Use contrasting fabrics for the ties – For fun, you could choose contrasting fabrics for the neck and waist ties.

Materials and Tools You’ll Need
- 2 metres (or yards) of fabric (for contrasting fabrics you need 1 metre (or yards) of each colour/print)
- PDF Apron Pattern
- Matching thread
- Sewing machine
- Fabric shears
- Pins
- Iron
Apron Video Tutorial

How to Sew an Apron Step-by-Step Tutorial
Step 1 – Print the pattern out
Download and print the PDF Apron Pattern. Assemble the pattern pieces and cut them out.
Step 2 – Cut out the apron
Lay your fabric on the fold, ensuring it’s smooth and wrinkle-free. Place the pattern pieces against the fabric fold and cut out the apron pieces as per the cut list below.
Cut out the following pieces:
- Apron: Cut 2 (a pair)
- Neckties: Cut 4 (2 pairs)
- Waist ties: Cut 4 (2 pairs)

Step 3 – Start sewing the apron
Take the pairs of waist ties and pin them right sides together. Sew around the short side and both long sides, leaving one end open, using a 1cm seam allowance. Trim the corners on the closed end.


Using a knitting needle or similar tool, turn the tie right side out and press it flat with an iron. Repeat these steps for the other waist tie and the neckties.

Step 4 – Attach the ties to the apron
Pin the neckties at the top of the apron, aligning the right sides together (as marked on the pattern). Leave a 1cm gap from the side of the apron curve to the tie. Repeat this step for the other necktie.
Pin the waist ties to the apron as marked on the sewing pattern, leaving a 1cm gap above the ties.


Next, sew the ties in place with a few back and forward rows of stitching to secure them well.
Step 5 – Lining the apron
Place the other apron piece on top, aligning the right sides together. Pin all the way around the apron edges. Make sure the ties are not in the way of any seams!

Sew all the way around the outside of the apron with a 1cm seam allowance, leaving a 10cm gap in the bottom hem.
Push the apron through the hole to the right side, wiggling out the corners, and press it flat.

Edgestitch the hole closed.
Step 6 – Start baking with your new apron!
Here are some of my favourite recipes:
- Chocolate Chip Cookies
- Macadamia Nut White Chocolate Cookies
- Apple Crumble
- Banana Chocolate Chip Muffins
- Homemade Condensed Milk Ice Cream
Frequently Asked Questions
Are there any specific fabric recommendations for this project?
You can choose from a variety of fabrics such as cotton, linen, or even lightweight canvas. Look for fabrics that are easy to work with and thick or absorbent for spills or splashes.
What are some tips for achieving clean and professional-looking seams?
Take your time while sewing and use pins or clips to help hold the fabric in place. Press your seams with an iron after sewing to get crisp lines. Don’t forget that pressing your work can make a huge difference. It’s often overlooked, but shouldn’t be!
More Beginner Sewing Projects to Try:
- How to Make Pot Holders
- DIY Drawstring Bags
- DIY Ruffle Pillowcases
- DIY Baby Blanket
- DIY Patchwork Laptop Case
How to Make an Apron
Learn how to make an apron that is beginner-friendly, simple, and quick to sew in under an hour. In this step-by-step tutorial, you'll learn how to make a beautiful and practical reversible apron that will protect your clothing and make you feel cute while cooking in your kitchen.
Materials
- 2 metres (or yards) of fabric (for contrasting fabrics you need 1 metre (or yards) of each colour/print)
- PDF Apron Pattern
- Matching thread
Tools
- Sewing machine
- Fabric shears
- Iron
- Pins
Instructions
- Print the pattern out
Download and print the PDF Apron Pattern. Assemble the pattern pieces and cut them out. - Cut out the apron
Lay your fabric on the fold, ensuring it's smooth and wrinkle-free. Place the pattern pieces against the fabric fold and cut out the apron pieces as per the cut list below. - Start sewing the apron
Take the pairs of waist ties and pin them right sides together. Sew around the short and long sides, leaving one end open, using a 1cm seam allowance. Trim the corners on the closed end. Using a knitting needle or similar tool, turn the tie right side out and press it flat with an iron. Repeat these steps for the other waist tie and the neckties. - Attach the ties to the apron
Pin the neckties at the top of the apron, aligning the right sides together (as marked on the pattern). Leave a 1cm gap from the side of the apron curve to the tie. Repeat this step for the other necktie. Pin the waist ties to the apron as marked on the sewing pattern, leaving a 1cm gap above the ties. Next, sew the ties in place with a few back
and forward rows of stitching to secure them well. - Lining the apron
Place the other apron piece on top, aligning the right sides together. Pin all the way around the apron edges. Make sure the ties are not in the way of any seams! Sew all the way around the outside of the apron with a 1cm seam allowance, leaving a 10cm gap in the bottom hem. Push the apron through the hole to the right side, wiggling out the corners, and press it flat. Edgestitch the hole closed.
Notes
- Play with contrasting fabrics - experiment with contrasting fabrics for each side of the apron. Especially helpful when you can’t decide what fabric to go with!
- Add functional pockets – Make your apron more functional by adding pockets to the front. This could just be a simple rectangle or square shape that is topstitched on. This detail adds charm and provides a convenient place to store small kitchen essentials.
- Use contrasting fabrics for the ties - For fun, you could choose contrasting fabrics for the neck and waist ties.


