If you’ve found your way here, chances are you’re curious about interfacing and how it fits into your sewing endeavours. Interfacing appears like material and is used to reinforce other fabrics, adding structure, and giving your sewing projects a polished, professional look.
Sewing projects require different techniques and fabrics, which I’m sure you already know! So many people start sewing only to find their garments look homemade and not to the standard they want to achieve. To get that professional look, interfacing is one of the keys.
Wondering what the other key is? It’s your trusty iron! Pressing your garments throughout the sewing process and when the garment is finished is a MUST!!!
This nifty sewing supply keeps your fabrics from getting distorted or ripped, while also providing support and stability to your garments. This is especially important in areas like buttonholes, zippers, cuffs, collars, waistbands, and pockets. By doing so, you can extend the life of your clothes and keep them in shape and looking great.
In this blog post, I will explain what interfacing is, the different types of interfacing available and how you can use it throughout your sewing projects to achieve professional-looking garments.
What Is Interfacing?
Interfacing is a type of stability material that can be added onto other fabrics by heat or sewing in. Since there are many types of fabrics that can be used in sewing, not all are the same weight, strength, or thickness. Some kinds of cotton, like denim, are thick and sturdy, but a cotton voile is lightweight, delicate, and thin.
If you sewed a buttonhole into a thin cotton voile the material may rip quickly because it’s thin and not stable enough to handle the tension. This is where interfacing comes in to save the day! By applying interfacing to the wrong side of the fabric, where the buttonhole is to be sewn, there will be extra support and stability added to the fabric.
What Is Interfacing Used For?
- Reinforcing Collars and Cuffs – to add structure and stiffness to collars and cuffs, which helps them maintain their shape and stand up properly.
- Stabilising Buttonholes – When it comes to buttonholes, interfacing is a real lifesaver! It stops the fabric from stretching and fraying and gives everything a tidy and secure look.
- Adding Body to Garments – If you’re looking to give your blazers, jackets, or structured dresses a more refined and put-together look, consider adding interfacing to give them added body and structure.
- Reinforcing Waistbands – A helpful tip for keeping your skirts, pants, and trousers looking their best is to add interfacing to the waistbands. This will help keep them stable and prevent any sagging, so you can feel confident and comfortable all day long.
- Enhancing Bag and Accessory Projects – In bag making, interfacing provides durability and structure to the fabric. This helps the bag keep its shape and carry heavier items without sagging or stretching.
- Strengthening Quilt Blocks – In quilting, interfacing can be used to reinforce quilt blocks, providing stability, and preventing distortion during the piecing process. This technique could be applied to my quilted jacket project.
- Supporting Appliqué and Embroidery – Interfacing is commonly used as a backing for appliqué and embroidered pieces, it adds stability and helps prevent the fabric from puckering or shifting during the process.
- Creating Structure in Hats – If you have ever tried making a bucket hat then you may know that interfacing can be used to add shape and stiffness to the hat.
There are two main types of interfacing to choose from fusible and non-fusible. Let’s look at each type and how to choose the right one for your sewing project.
1. Fusible Interfacing
Fusible interfacing is my personal favourite because it’s quick to apply and stays in place. Fusible interfacing has one side that is adhesive when exposed to heat, allowing it to bond fabrics together.
Types of Fusible Interfacing
When it comes to fusible interfacing, there are numerous options to choose from to suit your specific needs. There are specialised types like stretch and knit interfacing that can be used for specific fabrics or projects.
- Non-woven fusible interfacing – This type of interfacing is bonded together to look like a type of paper that has glue adhesive on one side.
- Woven fusible interfacing – Just like woven fabric, this type of interfacing has a grainline and should be treated as you would any other woven fabric when cutting out. One side has glue adhesive and the other doesn’t.
- Knit fusible interfacing – Just like knit fabric, this type of interfacing is knit together to create a stretch material that has glue adhesive on one side. Pay attention to the knit grainline.

How to Use Fusible Interfacing
Remember to test on scrap fabric first!
Step One: Follow the manufacturer’s instructions. Begin cutting the interfacing to shape.
Step Two: Place it on the wrong side of the fabric where the interfacing must go with the adhesive side down. Place a piece of calico or fabric over the interfacing to protect the fabric and iron plate and press the interfacing on. This may require a few seconds of heat to get the interfacing to adhere to the fabric.
Step Three: Check the interfacing has adhered to the fabric. If not repeat the steps again.
Pros of Fusible Interfacing
- No need to sew anything, just press the interfacing on with an iron.
- Quick to apply to most fabrics.
- Easy to place onto your fabric and press on.

Cons of Fusible Interfacing
- If applied incorrectly the interfacing can get stuck onto the iron plate.
- If the wrong temperature is used it can melt the interfacing or fabric you are using.
- It is difficult to remove if you make a mistake (it can warp your fabric upon removal).
- Some fabrics won’t bond with fusible interfacing so remember to patch test before using it on your actual project.
- Can’t be used on delicate or specialty materials.
2. Non-Fusible Interfacing
Have you ever heard of interfacing that doesn’t require heat? Instead of using heat, this type of interfacing is sewn directly onto the fabric. It’s perfect for delicate or special fabrics that can’t handle high temperatures. And, when it’s sewn into the seam allowance, you won’t even be able to see the stitching once your project is complete.

Types Of Non-Fusible Interfacing
When it comes to non-fusible interfacing, there are numerous options to choose from to suit your specific needs. There are specialised types like stretch and knit interfacing that can be used for specific fabrics or projects.
- Non-woven sew-in interfacing – This type of interfacing is fibres bonded together which looks like paper. It doesn’t have any glue adhesive and is instead sewn onto fabric.
- Woven non-fusible interfacing – Just like woven fabric, this type of interfacing has a grainline and should be treated as you would any other woven fabric when cutting out. One side has glue adhesive and the other doesn’t.
- Knit non-fusible interfacing – Just like knit fabric, this type of interfacing is knit together to create a stretch material that has no glue adhesive on one side instead it is sewn onto the fabric. Remember to still pay attention to the grainline.
How to Use Non-Fusible Interfacing
Remember to test on scrap fabric first!
Step One: Follow the manufacturer’s instructions. Begin cutting the interfacing to shape.
Step Two: Pin the interfacing to the wrong side of the fabric where the interfacing is to be placed.
Step Three: Sew around the interfacing within your seam allowance to keep the stitching hidden.
Pros of Non-Fusible Interfacing
- Easy to unpick and remove from fabric if you make a mistake.
- Can be a better option for delicate or specialty fabrics that can’t handle any heat.
- If applied with care, it can be more accurate than the fusible option.
Cons of Non-Fusible Interfacing
- Requires sewing. This uses more thread and more time than the fusible option.
- You could make a sewing mistake, like stretching the main fabric causing warping.
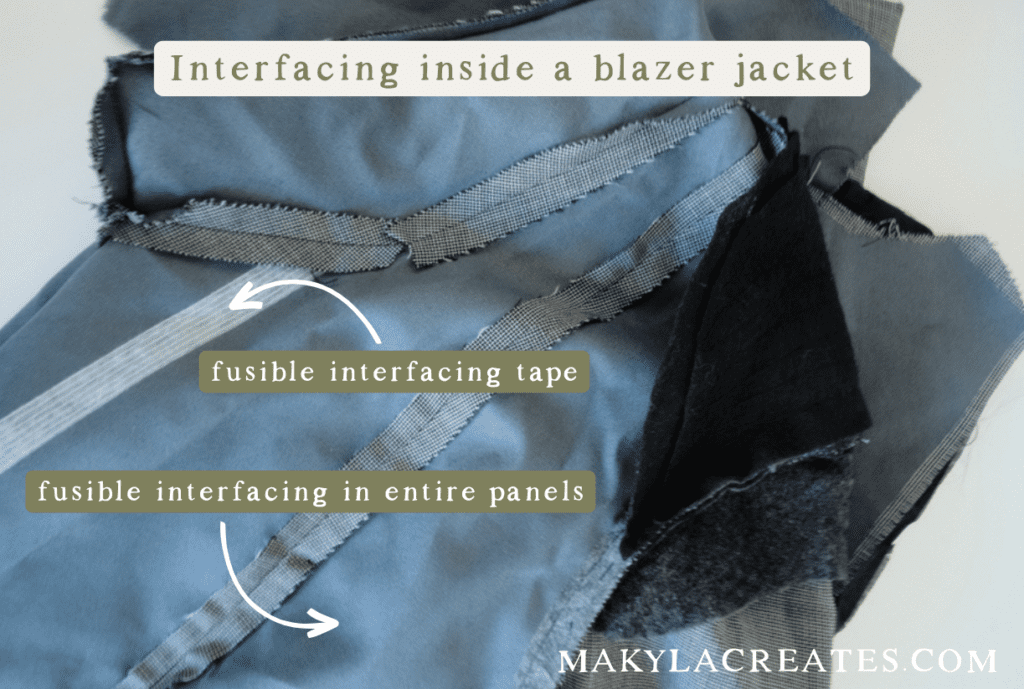
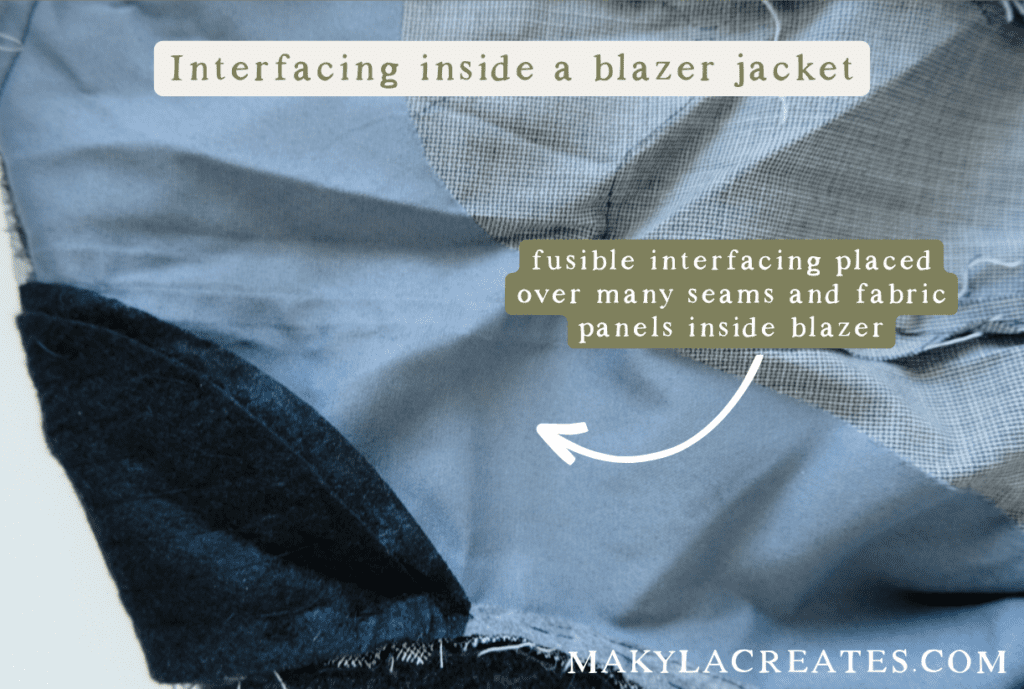
- Not good for areas where interfacing isn’t added within a seam allowance. This could be an area of a blazer or jacket like in the picture below where the interfacing needs to go over the seams to reinforce the fabric. Fusible is better in these situations.

What Weight Interfacing to Choose
You also need to consider the weight along with the different types of interfacings. You can find different weights such as lightweight, medium-weight, and heavyweight options.
The best way to choose this is to go for a similar weight as your fabric. If you are using a cotton voile, go for lightweight interfacing. If you’re making a pair of denim pants, go for medium to heavyweight interfacing.
To Sum up – What is Interfacing?
Interfacing is an essential tool in achieving professional-looking sewing projects. It provides structure, stability, and support to fabrics, reinforcing collars, cuffs, buttonholes, waistbands, and more. Interfacing enhances the durability and longevity of garments, preventing distortion and maintaining their shape. There are two main types of interfacing: fusible and non-fusible. Fusible interfacing is applied with heat, bonding to the fabric, while non-fusible interfacing is sewn directly onto the fabric. Each type has its advantages and considerations, and choosing the appropriate weight and type of interfacing depends on the fabric and project requirements.
Remember, pressing your garments throughout the sewing process, with the help of your trusty iron, is crucial. It ensures proper adhesion of fusible interfacing and creates a polished finish. So, if you want to elevate your sewing projects and achieve that professional touch, don’t forget to incorporate interfacing into your sewing toolkit.
Experiment with different types of interfacing and weights to determine what works best for your projects. With the right interfacing, you’ll be able to transform your creations into high-quality, well-structured garments that showcase your sewing skills. Happy sewing!
I’d like to make a simple tote bag with lining, which could also make it reversible. To make it a bit more sturdy, I was planning to use fusible interfacing. Since I’d like the tote bag to be reversible, should I use interfacing on both fabrics? If I only use it on one fabric, will that make it look funny when used with the non-interfaced fabric is on the outside? Thanks! I’m following your tote bag tutorial as it’s very simple and easy to follow.
Hi Amy, yes definitely use interfacing on both fabrics so it is the same weight and sturdiness on both sides of the tote bag. I’m so pleased you are finding the tote bag tutorial simple and easy 🙂