Create your own bandana easily with this beginner-friendly sewing tutorial. This stylish and fun accessory can be made in just 20 minutes, making it a great project for sewers of any level.
When I started, Makyla Creates, I designed and sold clothing before transitioning into sewing patterns. I made matching bandanas for many of the Camille Tops I had for sale so customers could have matching outfits. They were a hit!
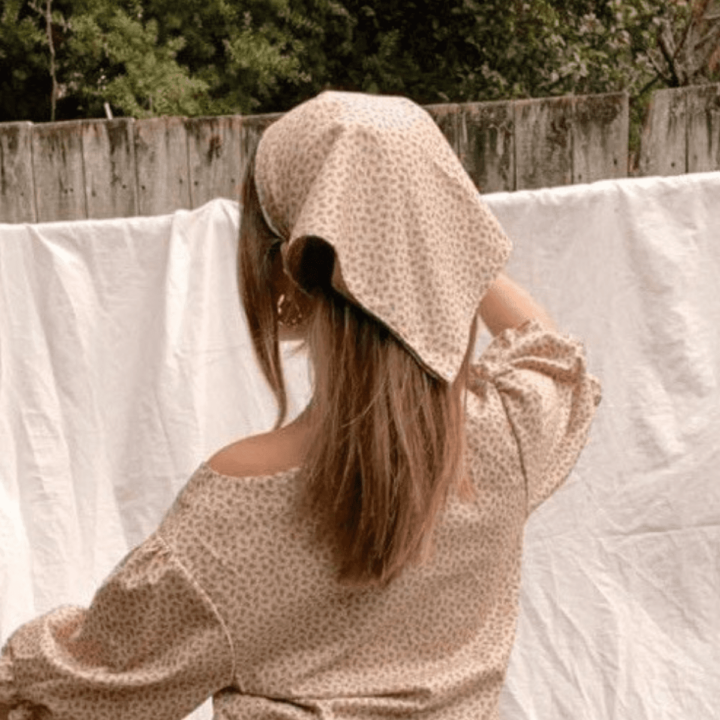
My beautiful friend Phibae kindly modelled some of the matching pieces for me, and this vintage beige floral set has to be my favourite!

This bandana pattern is tried and true and so easy to make. If you are new to sewing, this project couldn’t be easier and is a great place to start.
You can practise sewing lines with these sewing practice sheets first or learn how to sew seams.
As an Amazon Associate, I earn from qualifying purchases. Read my full disclosure here.

Want an ad-free copy of this tutorial? Scroll to the bottom of this post for more details!
How Much Fabric Do You Need For A Bandana?
I have included three sizes for this bandana pattern. A standard bandana size for an adult is 56cm (22″).
I have made a small size because I like less length when the bandana is tied up, but this is my preference.
Finished bandana sizes:
Small: 54cm x 54cm (21.3″ x 21.3″). The diagonal length is 58cm (22.8″).
Medium: 56cm x 56cm (22″ x 22″). The diagonal length is 60cm (23.6″).
Large: 58cm x 58cm (22.8″ x 22.8″). The diagonal length is 62cm(24.4″).

Tools And Materials You Will Need:
- 0.6m lightweight fabric
- Matching thread
- Fabric shears
- Tape measure
- Sewing machine
- Pins
- Cricut mini press or iron
What Material to Use for Bandanas
Any lightweight fabric will work for this bandana. Consider your sewing level because fabrics like silk require more sewing control.
- Cotton
- Rayon
- Linen
How to Make a Bandana
Step 1: Cut out a square
Begin by cutting out the fabric into a square as the size you require from the size guide.
The measurements below are how big to cut the bandana fabric, depending on your desired finished size.
Small: 58cm x 58cm (22.8″ x 22.8″)
Medium: 60cm x 60cm (23.6″ x 23.6″)
Large: 62cm x 62cm (24.4″ x 24.4″)
I folded my piece of fabric in half and then in half again to easily measure and cut 1/2 the full banana cut measurement. You can see below how much easier it is to cut a shorter length than if I tried to cut out an entire 58cm (22.8″) length on all sides.

Step 2: Fold and press the sides
Unfold the square of fabric and turn the sides up 1cm (1/2″). Press to hold in place. Then fold the edges over another 1cm (1/2″) to create a double-turned hem. Pin to hold in place.
You can use a hem gauge to help you fold the hem quickly.
If you prefer a smaller hem, you can reduce the hem size to 5mm (1/4″) turns.


Step 3: Sew the side hems
Edgestitch the side hems in place. Trim the threads.

Give your bandana a final press, then fold it in half with the corners touching to tie it around your head and wear.

Purchase this as a printable sewing pattern. Included are clear, step-by-step sewing instructions and a printable sewing pattern with three bandana sizes 54cm, 56cm, 60cm (22.8″, 22.8″, 24.4″).
Bandana Project Conclusion
This DIY bandana sewing project is perfect for beginner sewers or anyone wanting an enjoyable, quick project. I love making quick and easy projects when I need to get my sewjo back again. Happy sewing!
More Easy Beginner Sewing Projects:
- How to Make a Pin Cushion
- DIY Sleep Mask with Free Pattern
- How to Make a Drawstring Bag
- How to Sew Scrunchies – 3 Ways with Free Pattern
- DIY Heating Pad for Microwave
- DIY Ruffle Check Cushions {Heather Taylor Inspired}
How to Make a Bandana
Create your own bandana easily with this beginner-friendly sewing tutorial. This stylish and fun accessory can be made in just 20 minutes, making it a great project for sewers of any level.
Materials
- 0.6m lightweight fabric
- Matching thread
Tools
- Fabric shears
- Tape measure
- Sewing machine
- Pins
- Cricut mini press or iron
Instructions
- Finished bandana sizes:
Small: 54cm x 54cm (21.3" x 21.3"). The diagonal length is 58cm (22.8").
Medium: 56cm x 56cm (22" x 22"). The diagonal length is 60cm (23.6").
Large: 58cm x 58cm (22.8" x 22.8"). The diagonal length is 62cm(24.4") - Cut out a square
Begin by cutting out the fabric into a square as the size you require from the size guide. The measurements below are how big to cut the bandana fabric, depending on your desired finished size.
Small: 58cm x 58cm (22.8" x 22.8")
Medium: 60cm x 60cm (23.6" x 23.6")
Large: 62cm x 62cm (24.4" x 24.4")
I folded my piece of fabric in half and then in half again to easily measure and cut 1/2 the full banana cut measurement. You can see below how much easier it is to cut a shorter length than if I tried to cut out an entire 58cm (22.8") length on all sides. - Fold and press the sides
Unfold the square of fabric and turn the sides up 1cm (1/2"). Press to hold in place. Then fold the edges over another 1cm (1/2") to create a double-turned hem. Pin to hold in place. You can use a hem gauge to help you fold the hem quickly. If you prefer a smaller hem, you can reduce the hem size to 5mm (1/4") turns. - Sew the side hems
Edgestitch the side hems in place. Trim the threads. Give your bandana a final press, then fold it in half with the corners touching to tie it around your head and wear.
Notes
Suitable fabrics are any lightweight materials like cotton poplin, linen, rayon, silk or polyester.


Hello! I am trying to print the instructions to make this adorable bandana and the print link will not work. Help!
Hi Jennifer, do you have pop ups blocked? It may not be working because of this but after testing its working on my end. Thanks Makyla
Ha! I read the post in its entirety and see that if I want to print the instructions, I must purchase the pattern. I understand! Haha next time I’ll read the whole bit first! thank you! I love your posts and enjoy receiving your emails!
Hi Jennifer, you don’t need to pay to print the instructions at the bottom of the post. This is free. If you want to print out the sewing pattern, you need to pay for this 🙂 Thanks, Makyla